Tutorials
This page contains tutorials related to STAR computing. Report inaccuracies and deficiencies to the maintainer.Comments welcome - send them to the STAR Software Infrastructure Hypernews forum.
Please contribute tutorials (this page is editable, you may add a link to a page located in a different section)
If you are a new user and reached this page first, you may also want to read the documents below too Simulation and Geometry Tutorials
- Adding a New Detector to STAR
- How to simulate single particles in STAR
- ... and other Event Generators
- or the old school application: running starsim directly
- Howto run pythia6/8 or hijing or... without running starsim
Old tutorial pages resides here.
Data Carousel Quick Start/Tutorial
The Function of the Data Carousel
The Data Carousel should be used by STAR users to retrieve data from HPSS. The purpose of the data carousel is to organize the requests of users to retrieve data and to prevent chaos. User file requests are stored in a MySQL database. The Data Carousel consists of a collection of perl scripts (written by Jérôme Lauret) which provides the user with a simple way to submit requests. Keeping track of the number of requests made by the physics analysis and/or hardware/software groups ("accounting") is made by aa server which takes care of submitting requests according to needs.
In addition, the Data Carousel will warn you if a file you are requesting has already been requested by another user, so you do not waste the bandwidth in trying to restore something which is already there.
IMPORTANT Note: If you have an AFS HOME directory, you will NOT be able to use the Data Carousel tool due to a Unix-to-AFS poor hand-shaking (authentication failure). The solution : move back to NFS !!! There are more and more tools we discover on a monthly basis which does not work with AFS home directories ...
Getting Started
The client-perl scripts can be executed from any of the rcas nodes.
To do this, you need to create a file containing your requests from HPSS. There are several format you may use. All of the above example will assume you want to restore files from HPSS into a disk path /star/rcf/test/carousel/. You can of course restore files only to directories you actually have access to so, adapt the examples accordingly.
- In its simpliest form, and if you want to restore a list of files in the SAME directory, you may write a file.lis composed of one HPSS file specification per line
HPSSFile
For example, this file may contain the following lines% echo "/home/starreco/hpsslogs/logfile01_9903260110" >file.lis % echo "/home/starreco/hpsslogs/logfile01_9903260110" >>file.lis
Note at this stage that the HPSS file name may be specified as a relative path. The default prepended path is /home/starreco and the above file could have been written like this% echo "hpsslogs/logfile01_9903260110" >file.lis % echo "hpsslogs/logfile01_9903260110" >>file.lis
However, it is a good idea to write the HPSS file names with no ambiguities. - The second format is used whenever you want to restore a list of files but in diverse directories. In this case, the file2.lis is composed of key pairs
HPSSFile TargetFiles
For example, file2.lis may contain the following request:
/home/starreco/reco/central/P01hb/2000/08/st_physics_1235013_raw_0002.dst.root /star/rcf/test/carousel/New/jeromel/bla.dst
In this example, input and output file do not necessarily match. It is your entire choice to organized how you want to save those files. Also, it is to be noted that the current version of the Data Carousel will actually create the target directory if it does not exists. So, beware of the potential mess you may create if you miss-type the output file names ...As another example, file3.lis contains 4 files to be transferred:
/home/starreco/reco/central/P01hb/2000/08/st_physics_1235013_raw_0001.event.root /star/rcf/test/carousel/New/jeromel/physics/st_physics_1235013_raw_0001.event.root
/home/starreco/reco/central/P01hb/2000/08/st_physics_1235013_raw_0001.hist.root /star/rcf/test/carousel/New/jeromel/physics/st_physics_1235013_raw_0001.hist.root
/home/starreco/reco/central/P01hb/2000/08/st_physics_1235013_raw_0001.runco.root /star/rcf/test/carousel/New/jeromel/physics/st_physics_1235013_raw_0001.runco.root
/home/starreco/reco/central/P01hb/2000/08/st_physics_1235013_raw_0001.tags.root /star/rcf/test/carousel/New/jeromel/physics/st_physics_1235013_raw_0001.tags.root
Note that the full documentation specifies that the TargetFiles should be specified in the form pftp://user@node.domain.zone/UnixVisiblePathFromThatNode/Filename where user is your user name, and node.domain.zone being the node where to restore the file to. However, la later version of the Data Carousel (V01.150 or up) will add "smartness" in choosing the node to connect to in order to access the disk you want. But if you want to use the full syntax (actually the preferred unbreakable method), you MUST specify the machine where the disk physically sits. Be aware that doing otherwise will create unnecessary NFS traffic and will slow down your file restoration.
Running the Scripts
Now you are ready to execute hpss_user.pl (this should already be in your path at this stage). You should execute it from a cas node.
Following our examples, you would issue one of the following
% hpss_user.pl -r /star/rcf/test/carousel/New/ -f file.lis
% hpss_user.pl /home/starreco/hpsslogs/logfile01_9903271502 /star/rcf/test/carousel/New/logfile01_9903271502
% hpss_user.pl -f file2.lis
$ hpss_user.pl -f file3.lis
The first and second line are both equivalent. They both restore the file /home/starreco/hpsslogs/logfile01_9903271502 in /star/rcf/test/carousel/New/ ; the first using a file list, the second a request fully specified from the command line. Whenever -r is specified, this option MUST be specified prior to the -f option.
NOTE hpss_user.pl script will alter your ~/.shosts file and your ~/.netrc file. If these files do not already exist in your area, they will be automatically created. If they do already exist in your area, then they will simply be updated. The .shosts file must contain an entry to allow starrdat to remotly access your account, and the .netrc file allows you to access HPSS (via pftp) without prompting you for a username and password.
What Happens Next?
On the server end (rmds05), starrdat runs the server script. This script is invoked every 10 minutes by a cron job. The server script inspects the MySQL database and provides a list of input and output files to the script ORNL batch system (adapted by Tom Throwe) and report the operation status in its own internal accounting tables. In short, this process restores the files from HPSS.
Viewing your requests in MySQL database
In order to inspect the submissions, you may use a script which inspects the content of the Accounting table. The last column of that table reflects the Success of the reason for a failure.
User hooks
General introduction
The Data Carousel may call user scripts or user hooks at each file transfer. The mechanism works as follow :
- A directory named $HOME/carousel or $HOME/.carousel must first exist for this feature to work.
- 2 user hooks script may be used. They have fixed names (you CANOT change those names). They are named beforeFtp.pl and afterFtp.pl. They will be called prior and after each file restoration. They are user based, that is, only applicable to you and what you ask for.
- Both MUST be perl scripts. They DO NOT have to start with any perl command since the content of those files will be parsed, interpreted and executed externally by the main process (within an eval() statement).
- They MUST return a value which will be interpreted as an error level or status. A value of 0 is considered as being normal (nothing happened, 0 errors). In the case of beforeFtp.pl, any other value will make the Data Carousel porcess to abort the transaction. So, it is of the outmost importance that you take good care of having this script well debugged ... otherwise, you will lose file restore operations.
aftreFtp.pl user hook, if used tio return a non zero value, currently have no effect whatsoever on the Data Carousel process itself. However, you should also know that this script is called ONLY if everything went accordign to plan during the transfer. If something went wrong, the Data Carousel will revert to its normal error trap mechanism and will skip the execution of the post user hook. - Finally, it is noteworthy to mention th at ANY of the calls to those hooks will be killed after some time-out. So, using sleep(), long loops, pseudo-interractive process under the Data Carousel process and other fun you may come up with will not do you any good and only lead to killed transactions.
What are those hooks for ?
Those user hooks have been provided to help user execute commands/action before and after the file transfer. Amongst the possibilities are actions like
- Send yourself an Email whe a file is restored (or any other method of keeping track of what's going on).
- Checking if the disk where you want to restore your file has enough space to do so.
- Starting an LSF batch after the file has been successfully restored
- .... many other usage ...
There a certain number of variables you may use in both of those scripts and which will be known globally :
- $inFile the HPSS input file name
- $outFile the output file name
- $fsize the file size. BEWARE : The currently broken ORNL batch system is not reporting this size and it may appear as -1 from within beforeFtp.pl
- $dirnameThe directory name (extracted from $outFile)
- $HOME your home directory
An example of beforeFtp.pl script follows. Here, we check the available space on the target disk and rebuild a list of files we cannot retore due to space restrictions. This list will be palattable to the Data Carousel for later re-submit ...
# Solaris only. You should write a more fancy script for a
# full proof remaining disk size procedure.
$result = `/bin/df -k $dirname | awk '{print $2}' | tail -1`;

if ($fsize == -1){
   # Here, we return 0 but you can also take a guesstimate
   # of the minimal required space and save time.
   return 0;
} else {
   # The file size is known ...
   if ($result < $fsize){
      # will skip this file, keep the list though
      # so we can re-submit later on ...
      open(FO,">>$HOME/skipped.lis");
      print FO "$inFile $outFile\n";
      close(FO);
      return 1;
   } else {
      return 0;
   }
}
In this afterFtp.pl script, we keep trakc of what is restored (note that only successful restored call this user hook):
if ( open(FO,">>$HOME/success.lis")){   # keep track of files restored
   print FO "$outFile restored on ".localtime()."\n";
   close(FO);
}
chmod(oct(775),$outFile);               # make this file group rw :-)

1;                                      # always return success - be aware that failure <=> retry
Feel free to try and correct those examples yourself ...
Final comment
Note that those hooks are there to help you accomplish tasks which otherwise would required external scripts. But please, think carefully of the script you are writting and keep in mind that they will be executed for each file restored ... For example, a script doing a du -k instead of a df will be disastrous on the NFS server's load. Or a script touching or doing a stat() of all files in a directory tree for each file restored from HPSS would be an equally bad and considered as sabotage... In other words, keep your user hooks lite weighted.
Guide to AFS and ACLs
-
Brief User's guide
-
Groups
-
Access Control Lists (ACL)
-
AFS organization in STAR
-
RCF AFS service
-
More information
1. Brief User's guide
First, be sure your environment is set up correctly. This will ensure the AFS commands (normally resident in /usr/afsws/bin, /usr/afsws/etc) are on your path.1.1 aklog command:
cd to /afs and you will see the rhic directory. If your machine doesn't have an /afs directory, then it isn't an AFS client. If you're a RHIC user, the AFS cell is "Kerberized" that is, AFS tokens are granted through Kerberos/K5 authentication. Right after you login, check if you have a Kerberos ticket by typing the command% klistIf this command shows lines like
Ticket cache: FILE:/tmp/krb5cc_5650
Default principal: xxx@RHIC.BNL.GOV

Valid starting     Expires            Service principal
10/13/14 14:55:56  10/18/14 14:55:53  krbtgt/RHIC.BNL.GOV@RHIC.BNL.GOV
10/13/14 14:56:01  10/18/14 14:55:53  afs@RHIC.BNL.GOV
then you have Kerberos credentials and can proceed to execute
% aklogto get an AFS token. If the lines shows instead
klist: No credentials cache found (ticket cache FILE:/tmp/krb5cc_5650)your session does not have any Kerberos credentials and you will need to use instead
% kinit
{enter your Kerberos password at the prompt}
% aklog
1.2 tokens command:
To check if you get your token, issue tokens command:% tokens
1.3 kpasswd command:
To change your AFS password, issue kpasswd command:% kpasswd
1.4 fs command:
This is the most often used command. To get help, you can run 'man fs' or 'fs help' To list a directory's (ACLs):% fs la directoryTo set directories' ACLs:
% fs sa -dir directories -acl ACLentryEach ACLentry has two parts: a user or group name and the access control rights, separated by a space (for example, star rlidw). Type a combination of the seven letters representing the rights, or one of the four shorthand words.
Access Control Rights:
r: read l: lookup i: insert d: delete w: write k: lock
Shorthand Notation:
write = rlidwk read = rl all = rlidwka none = removes entry
1.4a Cache flushing:
The command% fs flushvolume -path pathwill trigger an AFS cache flush for the AFS volume that includes the specified file. Using 'flush' rather than 'flushvolume' will flush the file only. Sometimes when using AFS to access remote disks this can be necessary to avoid getting outdated material (I don't know why AFS fails to take care of updating itself).
1.5 Pts command:
List members of a group:pts mem group
List groups a user belongs to:
pts mem user
1.6 Unlog command:
To destroy your token, issue unlog command:unlog cell name
If you don't unlog, your token is still alive even when you logout.
For more information:
2. Groups
An AFS group is a defined list of individual users that you can place on the access control lists (ACLs) so that you can grant the same access rights to a number of people at once. When you create a group, you automatically become its owner. A group's owner is the only one allowed to administer the group. Administering a group includes adding members to it, removing members from it, renaming it, changing its owner, or deleting it entirely.2.1 Group Names:
Most group names have two parts, separated by a colon, as follows: owner-name:group-name, for example, starlib:sl_sys is created by starlib. The owner-name is the name of the owner of the group; the group-name is the actual name of the group. You may also encounter groups that do not have an owner prefix; these are special groups created by system administrators. For example, star and phenix are special groups. AFS defines three system groups that you can put on your ACLs.- system:anyuser - This group includes everybody.
- system:authuser - This group includes anyone who is currently authenticated in your cell.
- sytem:administrators - Only few people in this group who administer your cell.
2.2 Creating groups and adding members:
Use the pts creategroup command to create a group:pts creategroup -name <group name> -c rhic
(You have to specify the cell, rhic, if your default cell is different)
Use the pts adduser command to add user(s) to a group:
pts adduser -user <user name> -group <group name>
Example:
pts creategroup -name olson:sl_txm
pts adduser -user love toan irmscher jacobs tull -group olson:sl_txm
2.3 Removing Users from a group and deleting a group
Use the pts removeuser command to remove a user from a grouppts removeuser -user <user name> -group <group name>
Example:
pts removeuser -user jacobs -group bloomer:sl_txm
Use the pts delete command to delete a group entirely:
pts delete <group name> -c rhic
(You have to specify the cell, rhic, if your default cell is different)
Example:
pts delete bloomer:sl_txm
Note: After deleting group, you should run fs cleanacl command to remove deleted group(s) from ACLs.
Example:
After Olson removed the group olson:sl_txm, the group still appears on directory /afs/rhic/star/users/olson. To remove the group from the ACL of this directory:
fs cleanacl /afs/rhic/star/users/olson
2.4 Listing members of group
Use the pts mem command to display group's members.pts mem <group name>
Example:
pts mem star
pts mem -group star phenix
2.5 Changing a group's owner or name
Use the pts chown command to change the owner of a command.pts chown -name <group name> -owner <new owner>
Example:
Because Bloomer left, he wants to change the ownership to Olson:
pts chown -name bloomer:sl_txm -owner olson
Use the pts rename command to change the group's name:
pts rename <old name> <new name>
Example:
Olson wants to change olson:sl_txm to olson:sl_foo
pts rename olson:sl_txm olson:sl_foo
3. Access Control Lists (ACL)
Every directory has its own access control list (ACL) that is used to define which users or groups can access the directory and its files. Defining access at the directory level has several consequences: Files inherit the access rights associated with their parent directory. If you move a file to a new directory, the file gets the access rights of its new directory. When you create a subdirectory, it inherits the current access rights of its parents directory. You can then set the subdirectory's ACL to be different from its parents. There are 7 standard access rights available on ACLs:- The LOOKUP (l) right allows the possessor to issue ls
- The INSERT (i) right allows the possessor to create new files or directories.
- The DELETE (d) right allows the possessor to remove files or direcotries.
- The ADMIN (a) right allows the possessor to change the ACL for the directories
- The READ (r) right allows the possessor to read the contents of the files.
- The WRITE (w) right allows the possessor to modify the contents of the files.
- The LOCK (k) right allows the possessor to run programs that need to place advisory locks on files in the directory (don't worry about this right)
3.1 Listing an ACL
The fs listacl command is used to view a directory's ACL.fs la < dir path >
Example:
fs la /afs/rhic/star
fs la
fs la *
3.2 Setting/Changing an ACL
You are allowed to change any ACL for which you have the ADMIN right. Use the fs sa command to set/change the ACL.fs sa -dir < dir > -acl < users/groups > [rliwadk]
Example:
fs sa -dir /afs/rhic/star -acl star all phenix rl system:anyuser none
Here, star group has all 7 rights, but phenix group only has read and lookup, and sytem:anyuser (the world) doesn't have any rights at all.
4. AFS organization in STAR
The STAR AFS area is at /afs/rhic/star. The web area is at /STARAFS. This area includes the STAR software library in both supported release versions (dev, new, pro, frozen, old), and the actual CVS-managed code repository. The AFS-STAR disk area contains all the STAR-specific system software, user codes for simulations and analysis, documentation files, compiled architecture dependent object files and libraries, linked executables, infrastructure scripts and binaries and much more.AFS is particularly convenient for STAR computing at non-RCF sites. Under AFS, the offsite user is presented with the identical STAR AFS directory tree hierarchy and files. Because of the remote access capability, AFS requires additional security measures beyond the fairly lax procedures associated with the standard UNIX access restrictions. Under AFS, access to the managed directories and files is restricted via ACLs to users who are members of specific AFS groups. A given AFS directory may have different levels of access privileges and restrictions for one or more AFS groups. These groups are comprised of STAR AFS users who have need to access the particular library directories. ACL info is above.
4.1 STAR AFS Directory Hierarchy (Not an exhaustive list)
The following list includes the more relevant subdirectories under /afs/rhic/star for most user needs. Some directories are mostly obsolete (eg. login, starlib).
     /packages/repository -
                     CVS Repository for STAR software.  Includes source
                     codes, idl files, kumacs, etc. but not the
                     compiled binaries and executables.

     /packages/SL* - Built software releases including sources,
                       libraries, executables

     /packages/dev, /new, /pro, /frozen, /old
                   - Official release versions; generally links to SL*

     /bin          - SOFI tools (binary executables)

     /doc/www      - Web documentation files

     /group        - Setup and login scripts (based on HEPiX system)
5. RCF AFS service
The RHIC Computing Facility (RCF) provides STAR with our AFS service. Their AFS page, linked below, provides information on obtaining AFS accounts, general information on the service, information on remote installation, etc.
6. More information
Based on Tom Nguyen's original of March 1996.
How to determine what is happening in slow or stuck processes?
This tutorial is very specific to the cases where you have a process running (batch typically) and one of two conditions below is happening and you do not know why (but eventually, would like too :-) ):
- the program/chain is "slow" that is, there is no apparent reason for this to happen (no special load on the machine, your code should run fine and you know this) and you would like to estimate where (which portion of the code) does your program/chain spends its time idling
- the program/chain you are running is simply stuck and do not move into its processing stack, do not consume any CPU etc ...
Your program/chain is "slow"
Slow programs are still programs in execution mode. The best way to see what is happening is to use "strace".
[An example will be provided soon]
Your program/chain is "stuck"
If your program is really stuck, you will not be able to strace it as explained in the previous section. In fact, here is an example of what you would see under such conditions:
% ps -ef | grep root4star
starreco 11209 10955 97 May20 ?        1-07:30:59 root4star -b -q
bfc.C(100000,"DbV20080512 ry2007 in tpc_daq tpc fcf svt_daq SvtD Physics
Cdst Kalman l0 tags Tree evout l3onl emcDY2 fpd ftpc trgd ZDCvtx -dstout
CMuDst hitfilt Corr4 OSpaceZ2 OGridLeak3D","st_upc_8097121_raw_1150008.daq")
starreco  9178  8953  0 19:39 pts/0    00:00:00 grep root4star

% strace -p 11209
Process 11209 attached - interrupt to quit
...
strace would not show any unrolling call stack but simply wait there forever. You know you have a "stuck" process for sure and need to revert to the use of gdb. For the same process, this is what to do
% gdb
GNU gdb Red Hat Linux (6.3.0.0-1.143.el4rh)
Copyright 2004 Free Software Foundation, Inc.
GDB is free software, covered by the GNU General Public License, and you are
welcome to change it and/or distribute copies of it under certain conditions.
Type "show copying" to see the conditions.
There is absolutely no warranty for GDB.  Type "show warranty" for details.
This GDB was configured as "i386-redhat-linux-gnu".
(gdb) attach 11209
Attaching to process 11209
Reading symbols from
/afs/rhic.bnl.gov/star/packages/release10/SL08b/.sl44_gcc346/OBJ/asps/rexe/root4star.3...done.
Using host libthread_db library "/lib/tls/libthread_db.so.1".
Reading symbols from
/afs/rhic.bnl.gov/star/ROOT/20/5.12.00/.sl44_gcc346/root/lib/libCore.so...done.
Loaded symbols for
/afs/rhic.bnl.gov/star/ROOT/5.12.00/.sl44_gcc346/root/lib/libCore.so
...
there will be a lot of shared library loaded and finally
Reading symbols from /lib/libnss_files.so.2...done.
Loaded symbols for /lib/libnss_files.so.2
0x43f00fa1 in StarMagField::Search (this=0x54e16008, N=37, Xarray=0x54ec64c4, x=-nan(0x400000), low=@0x43f0a4c4)
    at .sl44_gcc346/OBJ/StRoot/StarMagField/StarMagField.cxx:1084
1084          if ( (Int_t)( x >= Xarray[middle] ) == ascend )
#0  0x43f00fa1 in StarMagField::Search (this=0x54e16008, N=37, Xarray=0x54ec64c4, x=-nan(0x400000), low=@0x43f0a4c4)
    at .sl44_gcc346/OBJ/StRoot/StarMagField/StarMagField.cxx:1084
#1  0x43f0071b in StarMagField::Interpolate3DBfield (this=0x54e16008, r=-nan(0x400000), z=-2.99321151e+33,
    phi=-nan(0x400000), Br_value=@0x45, Bz_value=@0x45, Bphi_value=@0x45)
    at .sl44_gcc346/OBJ/StRoot/StarMagField/StarMagField.cxx:844
#2  0x43efeafb in StarMagField::B3DField (this=0x54e16008, x=0xbffc8e70, B=0xbffc8e60)
    at .sl44_gcc346/OBJ/StRoot/StarMagField/StarMagField.cxx:482
#3  0x4d00c203 in StFtpcTrack::MomentumFit (this=0x1b5d72d8, vertex=0xbffc9610)
    at .sl44_gcc346/OBJ/StRoot/StFtpcTrackMaker/StFtpcTrackingParams.hh:344
#4  0x4d00b391 in StFtpcTrack::Fit (this=0x1b5d72d8, vertex=0xbffc9610, max_Dca=100, primary_fit=true)
    at .sl44_gcc346/OBJ/StRoot/StFtpcTrackMaker/StFtpcTrack.cc:575
#5  0x4d0257cc in StFtpcTracker::Fit (this=0xbffc93f0, primary_fit=Variable "primary_fit" is not available.
) at .sl44_gcc346/OBJ/StRoot/StFtpcTrackMaker/StFtpcTracker.cc:751
#6  0x4d01ee7e in StFtpcTrackMaker::Make (this=0xc9cf538) at .sl44_gcc346/OBJ/StRoot/StFtpcTrackMaker/StFtpcTracker.hh:64
#7  0x4285b0c0 in StMaker::Make (this=0xc9c58c0) at .sl44_gcc346/OBJ/StRoot/StChain/StMaker.cxx:965
#8  0x4285b0c0 in StMaker::Make (this=0xaf3e4c0) at .sl44_gcc346/OBJ/StRoot/StChain/StMaker.cxx:965
#9  0x4285426b in StChain::Make (this=0xaf3e4c0) at .sl44_gcc346/OBJ/StRoot/StChain/StChain.cxx:105
#10 0x4296022d in StBFChain::Make (this=0xaf3e4c0) at .sl44_gcc346/OBJ/StRoot/StBFChain/StBFChain.h:78
#11 0x4285522d in StMaker::IMake (this=0xaf3e4c0, number=275) at .sl44_gcc346/OBJ/StRoot/StChain/StMaker.h:110
#12 0x4295fd89 in StBFChain::Make (this=0xaf3e4c0, number=275) at .sl44_gcc346/include/StChain.h:49
#13 0x428545b0 in StChain::EventLoop (this=0xaf3e4c0, jBeg=1, jEnd=100000, outMk=0x0)
    at .sl44_gcc346/OBJ/StRoot/StChain/StChain.cxx:165
#14 0x4286d4a2 in G__StChain_Cint_541_9_0 () at /afs/rhic.bnl.gov/star/ROOT/5.12.00/.sl44_gcc346/root/include/TString.h:248
#15 0x40855c0c in G__ExceptionWrapper () from /afs/rhic.bnl.gov/star/ROOT/5.12.00/.sl44_gcc346/root/lib/libCint.so
#16 0x40911cda in G__call_cppfunc () from /afs/rhic.bnl.gov/star/ROOT/5.12.00/.sl44_gcc346/root/lib/libCint.so
#17 0x408ffd40 in G__interpret_func () from /afs/rhic.bnl.gov/star/ROOT/5.12.00/.sl44_gcc346/root/lib/libCint.so
#18 0x408ebb95 in G__getfunction () from /afs/rhic.bnl.gov/star/ROOT/5.12.00/.sl44_gcc346/root/lib/libCint.so
---Type <return> to continue, or q <return> to quit---q
Quit
(gdb)
Withing this stack, you see that the reason for this particular process to be stuck is
0x43f00fa1 in StarMagField::Search (this=0x54e16008, N=37, Xarray=0x54ec64c4, x=-nan(0x400000), low=@0x43f0a4c4)
    at .sl44_gcc346/OBJ/StRoot/StarMagField/StarMagField.cxx:1084
1084          if ( (Int_t)( x >= Xarray[middle] ) == ascend )
- A variable X is being used in a if() statement test condition but its value is NaN (-nan(0.x400000)) and this cause the call stack freeze.
- This problem is happening in StarMagField::Search at line 1084 (code StRoot/StarMagField/StarMagField.cxx)
- The calling upper function is StFtpcTrack::Fit in StFtpcTrack.cc but it is not clear the problem starts there (the NaN especially starts in StarMagField::Interpolate3DBfield and propagates to StarMagField::Search)
Your bug reporting could begin OR if this is your code, now starts the debugging process, editing code, setting breakpoints and stepping in the call stack inspecting the variables and why/when they are assigned to NaN and so on. Your logic may simply be obviously flaw so your first step is definitely editing the code and understanding its logic.
How to use FORtran from a ROOT macro
Conditions:To use the Fortran subroutines and functions 3 pre-conditions have to be met:
- Fortran code has to be compiled with the Fortran compiler
It is provided by "cons" for all source files with the upper case "*.F" extension
- To call any Fortran Subroutine / Function from C/C++ the Fortran subroutine C++ interface definition has to be provided
It has to be written "by hand"
- To execute the the Fortran Subroutines /Functions the Fortran run-time environment may be needed at the run-time.
The Fortran Run-time libraries are provided by "root4star". They are not provided by the "plain" root.exe
- (Optional) To be able to call the Fortran function from the Root C++ interpreter (from ROOT prompt) the RootCint dictionary for the C++/Fortran interface should be provided
The STAR "cons" automatically creates the RootCint dictionary for the all header files it discovery.
The examples follow:
Calling a FORtran subroutine from ROOT
To use the fortran subroutine from ROOT C++ macro you are advised to use STAR build env as follows
Let's assume you need to call the subroutine:
  SUBROUTINE FRAGMF(IPART,X,Q2,XGLUE,XUQ,XDQ,XSQ,XUSEA,XDSEA,XSSEA,
&        XCHARM,XCHARMS,XBEAUTY,XBEAUTYS)
from C++ code (including ROOT macro).
You should:
- Create a directory mkdir StRoot/Fragmf
- Add to that directory your fortran file with ".F" extension (upper case "F"), for example "fragmf.F"
- Create there 2 C++ files: "Fragmf.cxx" "Fragmf.h"
where
Fragmf.h
: defines the C++ interface for your fortan code
#ifndef STAR_FRAGMF_H
#define STAR_FRAGMF_H
#include "TObject.h"
class Fragmf {
   public:
         void operator()
         (int IPART, double &X,    double &Q2,   double &XGLUE
                   , double &XUQ,  double &XDQ,  double &XSQ
                   , double &XUSEA,double &XDSEA,double &XSSEA
                   , double &XCHARM, double &XCHARMS, double &XBEAUTY
                   , double &XBEAUTYS) const;
   ClassDef(Fragmf,0)
};
#endif
Fragmf.cxx
: the implementation of your C++ code:
#include "Fragmf/Fragmf.h"
ClassImp(Fragmf)
extern "C" {
  // definition fo the FORTRAN sunbroutine interface
  void fragmf_(int *, double *X, double *Q2,     double *XGLUE
             , double *XUQ,      double *XDQ,    double *XSQ
             , double *XUSEA,    double *XDSEA,  double *XSSEA
             , double *XCHARM,   double *XCHARMS,double *XBEAUTY
             , double *XBEAUTYS);
}
void Fragmf::operator()
         (int IPART, double &X,    double &Q2,   double &XGLUE
                   , double &XUQ,  double &XDQ,  double &XSQ
                   , double &XUSEA,double &XDSEA,double &XSSEA
                   , double &XCHARM, double &XCHARMS, double &XBEAUTY
                   , double &XBEAUTYS) const
{
  // definition of the C++ wrapper to simplify the FORTRAN
  // subroutine invocation
  int i = IPART;
  fragmf_(&i, &X,    &Q2,     &XGLUE,   &XUQ
            , &XDQ,  &XSQ,    &XUSEA,  &XDSEA
            , &XSSEA,&XCHARM, &XCHARMS,&XBEAUTY,&XBEAUTYS);
}
3. You can add the ROOT C++ macro to test your inteface
StRoot/Fragmf/Fragmf.C
:
{
 gSystem->Load("Fragmf");
 int IPART =8;
 double X,Q2,XGLUE, XUQ,  XDQ,  XSQ;
 double XUSEA,XDSEA,XSSEA, XCHARM, XCHARMS, XBEAUTY;
 double XBEAUTYS;
 Fragmf fragmf;
 // use "operator()" to proviide Fortran "Look and Feel"
 fragmf(IPART,X,Q2,XGLUE, XUQ,  XDQ,  XSQ
       ,XUSEA,XDSEA,XSSEA, XCHARM, XCHARMS, XBEAUTY
       ,XBEAUTYS);
 printf(" The values  from Fortran:\n"
 " %f %f,%f, %f,  %f,  %f \n"
 " %f,%f,%f, %f, %f, %f %f\n"
 , X,Q2,XGLUE, XUQ,  XDQ,  XSQ
 , XUSEA,XDSEA,XSSEA, XCHARM, XCHARMS, XBEAUTY
 , XBEAUTYS);
}
Now, you are ready to create the shared library with "cons"
> consand execute it with the ROOT
> root.exe -q StRoot/Fragmf/Fragmf.Cor
> root4star -q StRoot/Fragmf/Fragmf.COne needs the very "root4star" as soon his / her Fortran code requires some Fortran Run-Time functions. For example it calls the Fortran I/O or PRINT statements.
In real life, you may not create a dedicated subdirectory StRoot/Fragmf you can add the 3 files in question to any existent STAR offline package.
How to use valgrind
- Check you run in debug mode
% echo $NODEBUG
should give:
NODEBUG: Undefined variable.
If not do
% unsetenv NODEBUG
% stardev - Compile your code using cons
ex: % cons +Hbt - Run valgrind by default. There are 2 cases
- Version valgrind-20030725 on RedHat 7.2
% valgrind `which root4star` -b -q 'macros.C()' - Version valgrind-2.1.1 on RedHat 8.0 greater
% valgrind --tool=memcheck `which root4star` -b -q 'macros.C()'
- Version valgrind-20030725 on RedHat 7.2
- You can add some options, for example
- To redirect outputs in a file: --log-file=Valgrind.log
- To check memory leaks : --leak-check=yes
- For more options please look at this page
Howto run pythia6/8 or hijing or... without running starsim
If you want to run an event generator without running starsim, then this is the right page. There areexample macros running pythia6, pythia8 and hijing located in the StarGenerator area under StRoot.
To run pythia6:
$ cvs co StRoot/StarGenerators/macros/starsim.pythia6.standalone.C
$ ln -s StRoot/StarGenerators/macros/starsim.pythia6.standalone.C starsim.C
$ root4star -q -b starsim.C
To run pythia8:
$ cvs co StRoot/StarGenerators/macros/starsim.pythia8.standalone.C
$ ln -s StRoot/StarGenerators/macros/starsim.pythia8.standalone.C starsim.C
$ root4star -q -b starsim.C
To run hijing:
$ cvs co StRoot/StarGenerators/macros/starsim.hijing.standalone.C
$ ln -s StRoot/StarGenerators/macros/starsim.hijing.standalone.C starsim.C
$ root4star -q -b starsim.C
Introduction to STAR software and makers
A good reading for a newcomer to STAR is the presentation by Leszek Kosarzewski:Introduction to STAR software and makers
It can also be found in a link below, as it was presented during STAR Collaboration meeting in Stony Brook on 1 June 2015 You do not have access to view this node.
Quick guide on CVS in STAR
Quick menu
- General layout and CVS areas in STAR
- Access control via CVS "Karma"
- Command reference
- Important NOTES for STAR
- Other topics / advanced topics
- Other CVS information and resources
General layout and CVS areas in STAR
STAR uses CVS, the Concurrent Version control System, to manage the STAR software repositories. The current repository in use in STAR are:
| STAR offline repository | $CVSROOT/asps/ $CVSROOT/kumac/ $CVSROOT/mgr/ $CVSROOT/OnlTools/ $CVSROOT/pams/ $CVSROOT/QtRoot/ $CVSROOT/StarDb/ $CVSROOT/StDb/ $CVSROOT/StRoot/ |
This repository contains most of the STAR software used for data reconstruction, simulation and analysis. All codes in this category are subject to nightly builds. |
| STAR offline generic code repository | $CVSROOT/offline/ | This area contains a mix of (a) a set of test codes and Makers which are not yet ready for inclusion under StRoot (b) project specific codes such as xrootd, the data carousel (c) the paper area containing raw materials for STAR notes and published papers documentation (d) a generic user area. |
| STAR online repository | $CVSROOT/online/ | Is an area containing codes for detector sub-systems and aimed to be used online, but this area typically do not contain shared codes such as OnlTools (aka Online Plots or PPlots). |
| STAR login and script areas |
$CVSROOT/scripts/ |
Several areas contains scripts and configurations used for support of STAR's global login, general production related scripts and CGI or analysis related supported commands and configurations. |
| STAR ROOT pacthes | $CVSROOT/root/ $CVSROOT/root3/ $CVSROOT/root5/ |
Areas contains patches for ROOT in support of STAR software. |
One should never ever go to, browse in, touch, edit, or otherwise interfere with a CVS repository itself. Use the web browser, do a CVS checkout of the software of interest, make your changes and commit.
$CVSROOT/ current value is /afs/rhic.bnl.gov/star/packages/repository. Access in write mode to STAR's CVS repository is hence subject to AFS ACL in addition of the CVS Karma mechanism. Only STAR authenticated users have write access.
Access control -- Karma!
The STAR offline CVS repository employs an access control mechanism that allows only authorized accounts to modify parts of the hierarchy. Authorization control is for commits only; everyone can check out any part of the repository as far as you have access to AFS.
If you get a message Insufficient karma (yes, it's a weird message) it's an indication you do not have write access to the area you're trying to commit to.
The access list is $CVSROOT/CVSROOT/avail. A line like
avail |jeromel,didenko |scripts
means that jeromel and didenko can write (that is, modify and add items) to any directory under scripts/.
Note that you will not be able to commit a brand new package to the repository (unless you have a lot of karma) because there will be no entry giving you access to the area you're trying to create. You can create sub-directories under directories you have access to. Please, DO NOT attempt to add packages or directories but send a request to the starsofi list.
Command reference
cvs co module         = check out a copy of 'module' into your working directory
                        (you only need to do this once)
cvs co -r 1.12 module  = check out a copy of 'module' of version 1.12
cvs co -r SL09a module = check out a copy of 'module' that was tagged as SL09a
cvs update           = update all the files in the current directory
cvs -n update        = tells what it would update, but the -n means it doesn't do it
cvs -n update -A     = to get list of what it would update (-n means to not do it)
                       The "-A" is needed if you originally checked out a particular
                       tag - it tells the update to override the tag
cvs commit           = commit all of the files you have changed to the main repository
cvs ci -m "message"  = same as above, but enter explanatory message
cvs add file1        = alert CVS that file1 should be added to the repository at
                       the next 'cvs commit' invocation.
cvs rm  file1        = alert CVS that file1 should be removed from the repository at
                       the next 'cvs commit' invocation.
cvs status -v module = get list of all versions tagged
Whenever you check out, files may appear with a flag. As listed, the meanings are:
U = file was updated in your area
M = file was modified in your area (revisit)
? = cvs doesn't know about it
Advanced Commands/Hints
cvs history -Ta -n module = show all tags on 'module'
cvs diff -r HEAD file1    = show difference between my checked out file1 and the
                            most recent version in CVS
cvs rtag tagname module   = tag 'module' in CVS with 'tagname'
                            (NOTE: this creates a history entry, the 'cvs tag' command does not)
CVS/Entries               = this file shows you the tag and RCS version of what you checked out
Beyond the quick help
Please see at the bottom of this page for a quick reference card.
Important NOTES for STAR
The below are specific to STAR as we "tag" the whole slew of code regularly. "tags" represents snapshot in time of the whole sate of the repository and tree. In STAR, the CVS tag matches the library release version (for example, SL14b would be tagged SL14b).Working with a previous version of the code
If you want to check out a certain version of the code, it is not enough to do "starpro" and then "cvs co pams/tpc"!!! The same applies for any specific version of te STAR code you may want to use. Whenever you do a simple "cvs co", you will still get the dev version of pams/tpc.
To check out the a specific version, you must find which one (let's say SL09a) version it is. In our example case, it is SL09a. Then you would do
% cvs co -r SL14b pams/tpc
Now you must still do
% starver SL14b
and now you're totally in the environment set for SL09a and code checked out based on this library tag.
Getting history and tags of a particular file
If you want to know what tag has used for a particular file (for example pams/tpc/tpt.F) then you just need to type
% cvs status -v $STAR_ROOT/dev/pams/tpc/tpt/tpt.F
Other topics / advanced topics
Checking Out a Module for the First Time
To check out something for the first time use a command like this
% cvs co pams/tpc/tss
CVS will create directories called 'pams/tpc/tfs' in your current working directory and copy all of the files and sub-directories associated with the module 'tfs' into it. All of the remaining CVS commands should be issued from the 'tfs' directory.
Committing Your Changes to the Main Repository
If you have done nothing special when you cvs checkout the code, this process will be straight forward. You can edit any of the files you want in your working directory, and when you are ready to commit your changes to the master repository do,
% cvs commit {filename|*|}
CVS will start an editor (vi, pico or emacs depending on your environment variables EDITOR) and ask you to enter a text that will be stored as part of a history of changes. If this is successful, then your versions of the files will be copied back to the main site so that everyone can access them. Note that you can also, for a single file, use a form
% cvs commit -m "My relevant message explaining the change" tfs_ini.F
for committing the changed you made to tfs_ini.F and adding at the same time the relevant comment. Please, always think of adding a comment and remember that you are not the only one (or will not be) working on this code and hence, help to other developers as a courtesy is important.
Getting Updates and Merging Changes from Different Users
If someone else changes the files while you are working on your own copy, you must update your copy with the command cvs update to get the new versions. You can chose to update your files at any time. Before committing any files, CVS will check to see if you need to do an update. If you do, CVS prints a message and aborts the commit. If someone else has changed a file that you have also changed, CVS will attempt to merge the new changes into your file. If it is unsuccessful at doing so it will alert you to a 'conflict.'
If there is a conflict, the new file will contain sections that have both your changes and the other persons changes. These sections will be flagged by lines like
>>>>>>>>>>>>
and
<<<<<<<<<<<<
The user must then look at the conflicting regions, choose what is correct and edit the file.
Adding New files to an Existing Module
If you create new files, you have to tell CVS to put them into the repository. First do,
% cvs add newfile1 newfile2
then do a 'cvs commit' (do not forget the initial message / comment). The 'add' command alerts CVS to commit the named files at the next invocation of cvs commit.
Reverting to Old Versions of Files (Tags)
Every time you commit a file to CVS it increments a revision number. The first commit is 1.1 then 1.2 and 1.3 etc... (I don't know if it ever gets to 2.1 by itself though). To revert to an old version of a file you can use the version number as a tag as in
% cvs co -r 1.7 tfs_init.F
to check out version 1.6 of tfs_init.F.
You could also use the update command
% cvs update -r 1.7 tfs_init.F
but be careful that you don't commit the old version on top of the current version (jn the above example, you would). To see what version number the current file is do
% cvs status tfs_init.F
You can also revert to files that were tagged as a particular version by the user. For example
% cvs co -r sl97btpc pams/tpc/tfs
would check out all of the files that were tagged by somebody as version sl97btpc. To see what user tags have been created do
% cvs history -Ta -n pams/tpc/tss
You may also use commands that uses the revision differences (-j for join) and merge them into your current code. Let us say that you have version 1.5 of a code named filename and would like to revert it to version 1.4. What you would need to then is to
% cvs update -j 1.5 -j 1.4 filename
% cvs commit filename
The order of the versions are very important here. What you've asked cvs to do in the above command is to take the difference between versions 1.5 and 1.4 and apply them to your working copy. Because you apply to the current directory the differences between 1.5 to 1.4 (and yu have 1.5 in your current directory) you have effectively asked cvs to apply the changes necessary to revert your code to version 1.4 .
Working with sticky tags
cvs can branch the repository into separate fork in the development until such a time that you are satisfied with it and ready to re-merge. Usually, we do not use this feature in STAR so everyone works from the same code base. Besides, if too many branches are created, re-merging code may create conflict that will take time to sort (see the above note on code conflict while merging).
Sticky tags are used to create branches. To create a branch named BranchName, simply go into a working directory having all code that are in the repository and issue the command:
% cvs tag -b BranchName {Dir|File}
In the above {Dir|File} indicate a choice of either Dir or File: Dir represents the directory tree you would like to update or File a single file you would like to tag (probably not the greatest idea to generate to many branches for each code you have but, noted for consistency).
If unspecified, the whole code tree will be tagged. More generally, you WILL WANT to do this instead
% cvs tag Revisionname  {Dir|File}
% cvs tag -r Revisionname -b BranchName {Dir|File}
What this latest form will do is create a normal tag Revisionname first, then attach the branch named BranchName to that tag. This method may later facilitate merging or seeing differences made since a tagged version (otherwise, you may have a hard time to figure out the changes you made since you created the branch). Note that CVS has a special branch named MAIN which should always correspond to the CVS HEAD (the latest version of the code).
To work with branches, it is simple ...
% cvs co -r BranchName Dir
would checkout the code from the tree Dir that is in the branch named BranchName into your working directory. From this point on, you have nothing else to do. Just modify your code and cvs commit as usual. By default, the checkout command with a branch specification will create a "sticky tag" in your working directory, that is, cvs will persistently remember that you will be working from that branch. You may alos use "cvs update -r BranchName Dir" for similar effects (you would essentially update your working directory Dir and make it move to the branch BranchName).
** WARNING ***
You may destroy the sticky tag by using the folowing commands
% cvs update -A Dir
If you do this, what you are asking CVS is to update ignoring all sticky tags and updated based on the the MAIN branch. The command will remove all 'stickyness' of your working directory. Further commit will then go into the MAIN branch (or CVS HEAD). If you want to ensure you commit in the branch you intended, you will need to specify the branch name in your commit command as follows
% cvs commit -r BranchName Dir
Before discussing merging ...
Hint #1: It was noted that the most convenient way to create a sticky tag (or branch) is to use a regular tag and a branch tag combination (second set of commands in our cvs tag example above). This is because when you will be ready to remerge, you may find that you need to merge several branches together and those create conflicts you may have a hard time to sort out. You may be able to resolve those conflicts by issuing cvs diff commands with the tag revision Branchrevision where you branched in the first place
% cvs diff -r Revisionname -b BranchName {Dir|File}
will do that for you. But if you did NOT create a tag and branched from CVS HEAD, it will not be easy to make differences with the "base" you started with when you branched out (since CVS HEAD keeps changing). You may also try to fix conflicts by generating differences by using cvs diff as below:
% cvs diff -c -r BranchName1 -r Branchname2 >diffs.logand inspecting what you got. If you are the only person to modify those codes though, the advantage will be minimal.
One branch merging
Now, imagine you are satified with your changes and want to remerge them into MAIN. Then the fun begins ... An easy way to do this (if there has not been any other code divergence in MAIN hence no potential additional conflicts) would be to do this
% cvs update -j BranchName Dir
where Dir here is the location of code you want to update by "joining" the branch BranchName to it. If no conflict appears, you are set to go (with a cvs commit and voila! the code is remerged).
Two branches merging
Generally, if you want to merge two branches together, here are a few examples. Using checkout on a brand new directory tree ...
% cvs checkout -j BranchName1 -j BranchName2 {Dir|File}
this command will locate the differences between BranchName1 and BranchName2. Of the lines that are different between them, the lines in BranchName2 will be patched, or merged, into the latest revision on the main trunk of {Dir|File}. Any conflicts must be manually resolved by editting the file and verifying everything compiles and run properly.
Two branch merged into a third
Even more optimistic, you may remerge two branches into yet a third different branch. Here is an example building on the above
% cvs checkout -r BranchToMergeTo -j BranchName1 -j BranchName2 {Dir|File}
However, file that were created between BranchName1 and BranchName2 do not get created automatically.
Hint #2: When working with branches. cvs status is your friend. See why in the example below
% cvs status StRoot/StiPxl/StiPxlChairs.cxx
===================================================================
File: StiPxlChairs.cxx  Status: Up-to-date

   Working revision:    1.1     Sat Feb  1 19:19:34 2014
   Repository revision: 1.1     /afs/rhic.bnl.gov/star/packages/repository/StRoot/StiPxl/StiPxlChairs.cxx,v
   Sticky Tag:          StiHFT_1b (branch: 1.1.4)
   Sticky Date:         (none)
   Sticky Options:      (none)
In the above example, it is clear that the code checkout in the workig directory Dir = StRoot HAS a sticky tag StiHFT_1b . In contrast, the same command in a directory without a sticky tag would show
% cvs status StRoot/StiPxl/StiPxlChairs.cxx
===================================================================
File: StiPxlChairs.cxx  Status: Up-to-date

   Working revision:    1.1     Sat Feb  1 19:19:34 2014
   Repository revision: 1.1     /afs/rhic.bnl.gov/star/packages/repository/StRoot/StiPxl/StiPxlChairs.cxx,v
   Sticky Tag:          (none)
   Sticky Date:         (none)
   Sticky Options:      (none)
Sticky Tag: (none) cannot be clearer.
Creating a new module
The following command issued either from an empty directory or a directory containing (ONLY!) the material you want added to the new module
% cvs import -m "Message" repo_name tag_name tag_name
will create a new module called repo_name containing all the files in your directory. The repo_name can be just a directory name if the module sits at the top of the repository, or a path if the module lives down in the repository directory tree. The tag_name is the initially assigned tag (eg. 'V1.0').
Be aware that in STAR, you may be able to add a new repository to CVS but you will not be able to add files to it until you are granted appropriate karma. This additional step keeps STAR's CVS repository clean as the layout presented at the beginning of this document should be followed.
Other CVS information and resources
- Cyclic Software is a company specializing in providing commercial support for CVS. Their web site provides access to many useful and free CVS resources.
- Wikipedia CVS information.
Setting up your computing environment
RCF and AFS accounts
Before you can do anything you need an RCF account and an AFS account. Visit the Getting a computer account in STAR for information. When you obtain an account you're automatically given an AFS account as well. The contact person in the last part of the information must be your council representative who must vouch for you. Please, remember to bug your council representative so he can also inform Liz Mogavero of your recent arrival in STAR and send her the updated list of active members from your institution.
Once you have an account you have access to the RHIC AFS cell and the STAR directories and files mounted thereon. You must get an AFS token with the command aklog before accessing any AFS area.
Computers to use
See the Computing Environment or information on STAR and RHIC computers and printers. If you're bringing a computer of your own to BNL contact Jerome Lauret or Wayne Betts regarding an IP address.
Set up your login
This login environment is partly related to HEPiX, a standard within the HENP community and used at many labs. Starting in the middle of 2001, the standard STAR login was chosen to be a stand-alone minimal login instead of the default HEPix login and stack suite (which became unmaintainable and cumbersome). Older users should follow the above instructions and update their .cshrc and .login file if not already done.
The STAR group on the RCF machines is rhstar. The group directory with scripts for the STAR environment is GROUP_DIR = /afs/rhic.bnl.gov/rhstar/group. There is also a link /afs/rhic.bnl.gov/rhstar -> /afs/rhic.bnl.gov/star. Note that the initial /afs/rhic.bnl.gov/rhstar AFS volume needed to change name in mid-2003 to comply with Kerberos 5 authentication and token passing mechanism. It is however a link toward the rhic.bnl.gov volume but its use should be discontinued.
If your Unix group is different from star or rhstar, first of all you should ask to the RCF team that you be added to the rhstar group (submit a ticket, see the Software Infrastructure for more instructions). Several possibilities/scenario are now described :
- Your account was recently created by the RCF team : there should be nothing to do.
- Your account was created on a remote site, and you have access to the RHIC AFS cell : you could either
- Copy /afs/rhic.bnl.gov/star/group/templates/cshrc and /afs/rhic.bnl.gov/star/group/templates/login as .cshrc and .login in your home directory. Alternatively, the files are located in $GROUP_DIR at your local site (but there is a chicken and an egg issue - without a proper STAR login, GROUP_DIR will not be defined so you may have to ask your local sysadmin where it is located)
   % cp /afs/rhic.bnl.gov/star/group/templates/cshrc ~/.cshrc
   % cp /afs/rhic.bnl.gov/star/group/templates/login ~/.login
- You may want to copy/clone the /afs/rhic.bnl.gov/star/group on a local storage and modify the variable GROUP_DIR located on top of your .login and .cshrc after you have accomplish step 1.
- Copy /afs/rhic.bnl.gov/star/group/templates/cshrc and /afs/rhic.bnl.gov/star/group/templates/login as .cshrc and .login in your home directory. Alternatively, the files are located in $GROUP_DIR at your local site (but there is a chicken and an egg issue - without a proper STAR login, GROUP_DIR will not be defined so you may have to ask your local sysadmin where it is located)
Then you can customize both .cshrc and .login for your taste (or source separate personal setups from them).
When you next logout and log back in, your PATH, MANPATH, and LD_LIBRARY_PATH will include the proper STAR directories. Your environment variables will also include several STAR variables (below).
The group login script
The group environment variables are defined in the group_env.csh script. Some of the more important environment variables set up by this script follows. The variable in blue, if defined before the login scripts are loaded, will not be superseded. Variables in green are likely already defined if the optional component has been deployed on your machine. Variable in red are fixed values on purpose to ensure compatibility and the strict install path MUST be present for STAR's environment to load properly.
- AFS : afs utility directory [ default = /usr/afsws ]
- AFS_RHIC : top rhic directory path [ default = /afs/rhic.bnl.gov ]
- CERN : a canonical base path for the CERN environment. If undefined the first path in the following list found will be used as default starting point: /cern, ${AFS_RHIC}/asis/@sys/cern, /usr/local/cern, /common/star/cern . If the USE_64BITS environment variable is set, the 64 bits path will be assumed. The path ${CERN}64 will be searched (for example /cern64) and if not found, the full previous list will be searched for and additionally, each path with the post-fixed "64" will be also search.
If nothing is found (still), a default value /cern will be set - CERN_LEVEL : base path for the current version of CERN library.
If undefined, will be set to “pro” - CERN_ROOT: will equate to ${CERN}/${CERN_LEVEL}
- CVSROOT : the STAR CVS repository. A local install with AFS access would define this as the AFS version before the login scripts executes. BUT the default is otherwise ${STAR_PATH}/repository if this path is found (for a local install, do NOT create this directory and define CVSROOT to point to the AFS version). A soft-link to the AFS area would equally work.
- GROUP_DIR : star group login scripts [ default = $AFS_RHIC/star/group/ ] . This directory contains login scripts used to setup the rest of the environment. Note that you should be able to cvs checkout as-is this directory on your local machine / cluster and still be functional. If this is not the case, you should contact the Infrastructure Leader immediately.
- XOPTSTAR : AFS resident base directory [ default = ${AFS_RHIC}/opt/star (see also $OPTSTAR below). Although this variable may be redefined, it would be hazardous to do so ...
- OPTSTAR : Base directory for updates of /usr/XXX or /usr/local/XXX [ default = either /opt/star if exists or $XOPTSTAR ]. Note that for a local setup, the entire tree $XOPTSTAR may be installed on your local cluster and $OPTSTAR variable defined appropriately before loading the group environment script.
- SCRATCH : This variable indicates a SCRATCH space which may be used by a job in a batch system.
Note the variable SCRATCH_LOCAL is defined, SCRATCH will take its value.
If undefined, SCRATCH will take the value of (in this order) TMPDIR (if defined), /scratch/$LOGNAME if /scratch exists and is writable or finally, /tmp/$LOGNAME. - STAR : the top directory path for the particular version of STAR software
- STAR_ROOT : the top directory path to all STAR software [default = ${AFS_RHIC}/star or /usr/local/star ]
- STAR_PATH : the top directory path to STAR release libraries software [ ${STAR_ROOT}/packages]
- STAR_LEVEL : dev/new/pro/old version of software. If undefined, the default value is “pro”
- STAR_VERSION: SL98d/SL98c/SL98b/SL98a version of software
- INTELC_VERSION: 9.1, 10.1 and so on, a version of the intel compiler to be considered as default if defined (and if installed)
- ROOT: If defined, this will be the base path for finding the ROOT package installation files. Each revision is supposed to be appear under ${ROOT} and the STAR ROOT installation directory tree is expected to be found underneath (see Building ROOT in STAR for more information). Essentially, ROOTSYS, ROOT_LEVEL will be set by our login script. If not defined, SAR login will search for it in ${STAR_ROOT}/ROOT .
- ROOTSYS : ROOT system directory
- STAR_SYS : architecture (i386_linux2, sun4x_56, i386_sl302 ...).
This is what is used for AFS access via the @sys replacement.
In a local installation environment (non-AFS based), this variable need to be used to access the partition containing the equivalent of what you find in AFS land. - STAR_HOST_SYS : architecture flag used for separating compilation results (may be be equal to STAR_SYS but usually, contains the compiler style and version in it).
- STAR_LIB : the top directory path of the particular version of STAR Library (usually set to something like $STAR/.${STAR_HOST_SYS}/lib )
- STAR_BIN : the pointer to StAF executables, Geant3, stic, ...
- STAR_DATA : the top directory for ``test'' data samples. This defaults to ${STAR_ROOT}/data but is not essential for the STAR environment. Hence, if this path is not found, the ogin will not define this environment variable and continue. You may also create a soft-link to the AFS area (but this again is not needed and historical).
- USE_GCC_DIR : an alternate path for gcc installation. This is a one time definition (you cannot redefine, re-execute the login and have the path reset). Alternatively, the "setup" script provides provision for alternate gcc version to be installed as /opt/gcc/$version (multiple version support) and this environment was only provides for sites that cannot comply with the more flexible location.
Other variables are
- CLHEP_BASE_DIR : base path for the CLHEP libraries. [ default = ${OPTSTAR} ]
- QTDIR : the base path for Qt installation. Equal to $OPTSTAR/qt and if found, will overwrite any value previously set. If not found, $OPTSTAR/qt3 and $OPTSTAR/qt4 will be searched in respective order and QTDIR defined accordingly but only if QTDIR is not already defined (no overwrite in this case).
- INSV : the insure version level. The login script will be looking in $AFS_RHIC/app/$INSV if this directory exists
- JAVA_ROOT : the base path for java installation. Directories like bin/ man/ etc ... are expected to be below this level [default = latest version in /usr/java ]
- WNOSG: a path where a Worker Node, client install of the grid toolkit is available.
- GLOBUS_PATH : a path to “a” globus installation is available (old VDT or new OSG). If found, WNOSG will NOT be considered.
- OSG: a path where an OSG installation exists. This will overwrite the GLOBUS/VDT definitions and WNOSG will be ignored.
The following environment variables may, if defined, affect run-time of our STAR code - DO NOT set those yourself unless permission granted.
- StarEndMakerShell - if defined, prints additional statistics from StMaker related to Memory (using StMemStat) - expensive operation, makes sense on production mode only or when the chain time is much larger than the invocation of statistics collections (i.e. not goof for user anlaysis)
- HYPERCONFIG_LOCATION - the fully specified location of the HyperCache configuration (replaces the default $STAR_PATH/conf/hyperconfig.json) - debug mode only
- STAR_DEBUG_DB_RETRIES_ADMINS - used by StDbServiceBroker service, defines a set of administrators who will receive an Email in case of DB connection problems. If defined, an Email will be sent of no connections is granted within STAR_DEBUG_DB_RETRIES_SECONDS (default 1800 seconds or 30 minutes).
The PATH environment variable is appended with directories containing executables which are needed by the STAR computing environment. For example:
- /usr/afsws/bin : AFS utilities
- /usr/afsws/etc : AFS utilities
- /opt/rhic/bin : opt rhic is RHIC wide update for /usr/bin and /usr/local/bin .
- /usr/local/bin : updates to /usr/bin. At the RCF this is what we took from CERN
- $STAR/mgr : scripts for ``dev/new/pro/old'' version of STAR library
- /usr/sbin : System
- /opt/SUNWspro/bin : System (Sun syste only - obsolete)
- /usr/ccs/bin : System
- /usr/ccs/lib : System
- /usr/bin : System
- /usr/openwin/bin : System
- /usr/dt/bin : System
- /usr/ucb : System
- /usr/local/bin/X11 : System
Note on /afs/rhic.bnl.gov/opt/star and /opt/star versus Linux
While at the RCF, /opt/star is a soft link to /afs/rhic.bnl.gov/opt/star/, there is a misleading component to the the path /afs/rhic.bnl.gov/opt/star ... The real path is /afs/rhic.bnl.gov/@sys/opt/star and depends on the result of the translation of the AFS @sys set on YOUR client. The current translation has been so far as follow
-
Linux release support Notes or
Also supportsResult of fs sysname MUST be RH 6.1 (obsolete) i386_redhat61 RH 7.2 (obsolete) i386_linux24 RH 8 (obsolete) i386_redhat80 SL 3.0.2 (obsolete - was for gcc 3.2.3, SL 3.0.4, rh3 but no build node available at BNL - EOL was end of 2008) i386_sl302 SL 3.0.5 (obsolete - was gcc 3.2.3 - SL 3.0.{6|7|8|9}, rh3) i386_sl305 SL 4.4 gcc 3.4.6 - SL 4.5, rh4 i386_sl4 SL 5 gcc 4.3.2 - SL 5.3 native, {sl|rh}55 & 56 & 57 with gcc 4.3.2 x8664_sl5 (32 / 64 bits)
i386_sl5 (32 bits only)SL6 gcc 4.4.6 - SL 6.2 native x8664_sl6 (32 and 64 bits)
A typical problem for off-site facilities is to deploy a version of Linux with no match for sysname (or wrong match). For example, RedHat8.0 set with i386_linux24 will pick up the program in the wrong AFS area, a RedHat 9.0 system would be equally problematic as currently not supported. There are some backward compatibility support for other Linux OS versions we document in the second column. If your OS does not appear in this table, you could send a note for a request support to the offsites or starsofi Hypernews fora.
The sysname is configured in /etc/sysconfig/afs . It uses a default value or is set via a line similar to the following
AFS_POST_INIT="/usr/bin/fs sysname -newsys i386_sl5"
StEvent/Special documentation
This web page is an access point to documentation for STAR Offline Software libraries with special needs. For example, if the documentation in written as a LaTeX file and needs to be converted to a PostScript or PDF file.
Details
This web page accesses a cache of documentation created from Makefiles in the doc subdirectories of these packages. This cache may take an hour to synchronize with changes in the files, so please do not expect a CVS commit to appear immediately. It is also important that those who write the documentation insure that the Makefile works. If the Makefile doesn't work, then this web page doesn't work.UML Class Diagram
This tutorial was imported from KDE's Umbrello tutorial giving a nice overview of the UML elements.
Class Diagram
Class Diagrams show the different classes that make up a system and how they relate to each other. Class Diagrams are said to be “static” diagrams because they show the classes, along with their methods and attributes as well as the static relationships between them: which classes “know” about which classes or which classes “are part” of another class, but do not show the method calls between them.

Umbrello UML Modeller showing a Class Diagram.
Class
A Class defines the attributes and the methods of a set of objects. All objects of this class (instances of this class) share the same behaviour, and have the same set of attributes (each object has its own set). The term “Type” is sometimes used instead of Class, but it is important to mention that these two are not the same, and Type is a more general term.
In UML, Classes are represented by rectangles, with the name of the class, and can also show the attributes and operations of the class in two other “compartments” inside the rectangle.
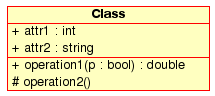
Visual representation of a Class in UML
Attributes
In UML, Attributes are shown with at least their name, and can also show their type, initial value and other properties. Attributes can also be displayed with their visibility:
-
+Stands for public attributes -
#Stands for protected attributes -
-Stands for private attributes
Operations (methods) are also displayed with at least their name, and can also show their parameters and return types. Operations can, just as Attributes, display their visibility:
-
+Stands for public operations -
#Stands for protected operations -
-Stands for private operations
Classes can relate (be associated with) to each other in different ways:
Inheritance is one of the fundamental concepts of Object Orientated programming, in which a class “gains” all of the attributes and operations of the class it inherits from, and can override/modify some of them, as well as add more attributes and operations of its own.
In UML, a Generalisation association between two classes puts them in a hierarchy representing the concept of inheritance of a derived class from a base class. In UML, Generalisations are represented by a line connecting the two classes, with an arrow on the side of the base class.
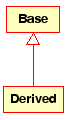
Visual representation of a generalisation in UML
Associations
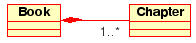
An association represents a relationship between classes, and gives the common semantics and structure for many types of “connections” between objects.
Associations are the mechanism that allows objects to communicate to each other. It describes the connection between different classes (the connection between the actual objects is called object connection, or link.
Associations can have a role that specifies the purpose of the association and can be uni- or bidirectional (indicates if the two objects participating in the relationship can send messages to the other, of if only one of them knows about the other). Each end of the association also has a multiplicity value, which dictates how many objects on this side of the association can relate to one object on the other side.
In UML, associations are represented as lines connecting the classes participating in the relationship, and can also show the role and the multiplicity of each of the participants. Multiplicity is displayed as a range [min..max] of non-negative values, with a star (*) on the maximum side representing infinite.

Visual representation of an Association in UML
Aggregation
Aggregations are a special type of associations in which the two participating classes don't have an equal status, but make a “whole-part” relationship. An Aggregation describes how the class that takes the role of the whole, is composed (has) of other classes, which take the role of the parts. For Aggregations, the class acting as the whole always has a multiplicity of one.
In UML, Aggregations are represented by an association that shows a rhomb on the side of the whole.

Visual representation of an Aggregation relationship in UML
Composition
Compositions are associations that represent very strong aggregations. This means, Compositions form whole-part relationships as well, but the relationship is so strong that the parts cannot exist on its own. They exist only inside the whole, and if the whole is destroyed the parts die too.
In UML, Compositions are represented by a solid rhomb on the side of the whole.
Other Class Diagram Items
Class diagrams can contain several other items besides classes.
Interfaces are abstract classes which means instances can not be directly created of them. They can contain operations but no attributes. Classes can inherit from interfaces (through a realisation association) and instances can then be made of these classes.
Datatypes are primitives which are typically built into a programming language. Common examples include integers and booleans. They can not have relationships to classes but classes can have relationships to them.
Enums are a simple list of values. A typical example is an enum for days of the week. The options of an enum are called Enum Literals. Like datatypes they can not have relationships to classes but classes can have relationships to them.
Unix command location
This is a quick reference of unix program's path locations.| Program | Path | Comment |
|---|---|---|
| awk | /bin/awk | MAC has it in /usr/bin |
| basename | /bin/basename | MAC has it in /usr/bin |
| cat | /bin/cat | |
| cp | /bin/cp | |
| cut | /usr/bin/cut | |
| crontab | /usr/bin/crontab | |
| df | /bin/df | |
| date | /bin/date | |
| domainname | /bin/domainname | |
| find | /usr/bin/find | |
| grep | /bin/grep |
On Solaris, /usr/xpg4/bin/grep allows for extended pattern
while the default do not (for example, -E only with xpg4) MAC has it in /usr/bin |
| hostname | /bin/hostname | |
| id | /usr/bin/id | (checked only on Solaris & Linux) |
| mkdir | /bin/mkdir | |
| mkfifo | /usr/bin/mkfifo | |
| netstat |
/bin/netstat /usr/sbin/netstat |
Linux/Solaris True64 |
| nm | This program do not have a standard location | |
| ps | /bin/ps | |
| pwd | /bin/pwd | |
| rm | /bin/rm | |
| sed | /bin/sed | MAC has it in /usr/bin |
| sort | /bin/sort | |
| tail | /usr/bin/tail | |
| test | /usr/bin/test | On MAC, it is /bin/test but on Linux, there are NO such file |
| uname | /bin/uname | MAC has it in /usr/bin |
| uniq | /usr/bin/uniq | |
| touch | /bin/touch | |
| uptime | /usr/bin/uptime | |
| vmstat | /usr/bin/vmstat | |
| wc | /usr/bin/wc | |
| xargs | /usr/bin/xargs |