Introduction for heavy flavor D meson
1.MC simulation
We use Pythia 8 to simulate Heavy Flavor D meson.
Code example: /star/u/amcw7777/pwg/MCProduction/Produce/starsim.C
Geometry tag: y2014a
We choose the HardQCD processes in Heavy Flavor
      pythia8->Set("HardQCD:gg2ccbar = on");

      pythia8->Set("HardQCD:qqbar2ccbar = on");

      pythia8->Set("HardQCD:gg2bbbar = on");

      pythia8->Set("HardQCD:qqbar2bbbar = on");
We can also control whether the switch of D (Dbar) decay is on or off using the number of the process
pythia8->Set("421:onMode=0"); // switch off D+/- decays
pythia8->Set("-421:onMode=0"); // switch off D+/- decays
pythia8->Set("421:onIfMatch=211 -321"); // switch on for decays to pi+/- and pi0
pythia8->Set("-421:onIfMatch=-211 321"); // switch on for decays to pi+/- and pi0
We also set the vertex Z in flat (-5,5)
  chain->EventLoop(n);

        vz = StarRandom::flat(-5,5);

        cout<<"vx:"<<vx<<" vy:"<<vy<<" vz:"<<vz<<endl;

        primary -> SetVertex( 0,0, vz);

        primary -> SetSigma( 0,0,0);

  primary->event()->Print();

2.Filter
We apply a filter on the channel we are going to study.
Filter example: /star/u/amcw7777/pwg/MCProduction/Produce/StRoot/StarGenerator/FILT/StDmesonFilter.cxx
In this example, we are going to pick up the ccbar->D^0^->k^-^ + \Pi^+^. So we require the mother of D^0^ should be c and cbar.
Then the daughters should be k^-^ and \Pi^+^. We use PdgId to identify the type of the particle. For example:
Then the daughters should be k^-^ and \Pi^+^. We use PdgId to identify the type of the particle. For example:
  while( ( p = (StarGenParticle*)Iterator.Next() ) )

  {

    if(p->GetId() == 421)

    {

      indexDmeson = p->GetIndex();//Find D meson

      DmesonDaughter1 = p->GetFirstDaughter();//D meson's first child's index

     }

  }
3.BFC, Reconstruction and Simulation
The options are:set chain=tpcRS,y2014a,AgML,MakeEvent,tables,SimuDb,VFMinuit,pxlFastSim,istFastSim,Idst,BAna,l0,Tree,logger, Sti,StiPxl,StiIst,StiHftC,-SstIT,-ssdDb,TpcHitMover,TpxClu,bbcSim,btofsim,mtdsim,-tags,emcY2,EEfs,evout,geantout, IdTruth,geant,big,fzin,clearmem,HftMatTree,mtdMatch
But the lib now is still a big problem. We need to use starver DEV. And copy the HFT packages to local directory.
/star/u/amcw7777/pwg/hft/pp_bc/StRoot
And run makelinks.sh* to make the link to HFT package. By now only DEV lib works and STAR announced the newest version but it doesn't work anyway.
This package I copied comes from lib in July 2014.
Reconstruction code example: /star/u/amcw7777/pwg/MCProduction/Reconstruction/runReco.csh
The input file is .fzd files generated by Pythia. We are using y2014a geometry tag here. And we *didn't* use pile-up package yet.
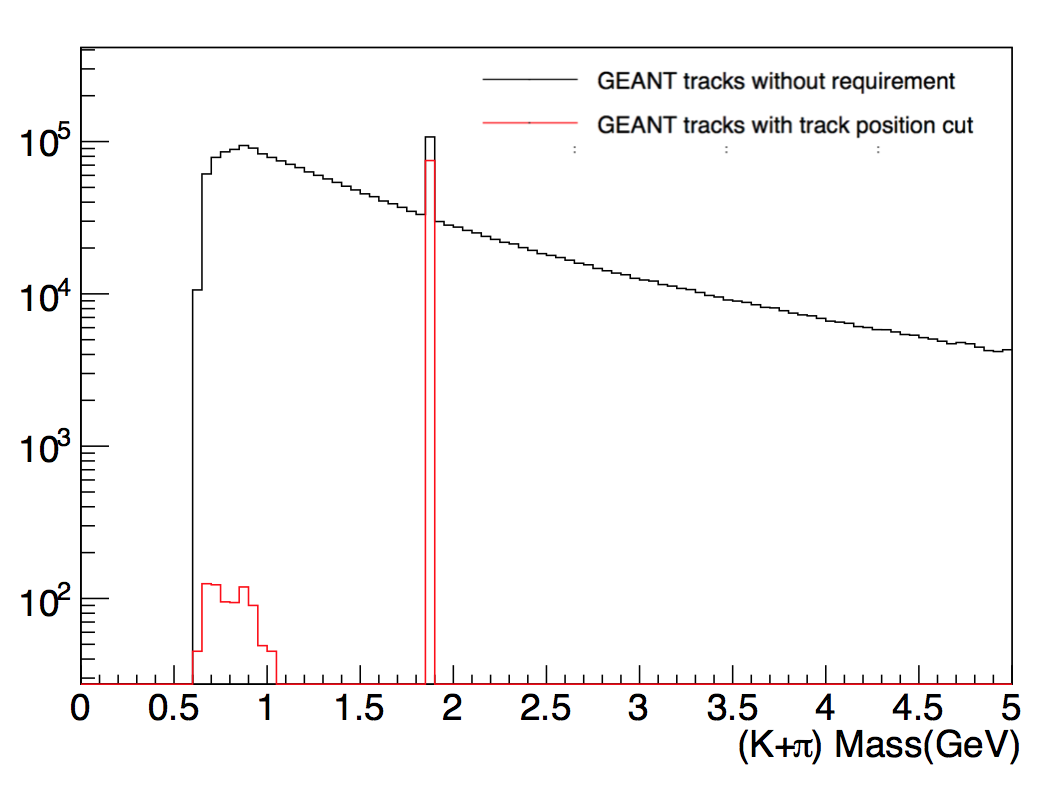
To check if the D is still in the geant output file. We draw the plot of (π+K) of StMcTrack invariance mass. The red curve requires 1)K and π come from same
position; 2)dR(primary vertex)>10^-10.
To check if the D is still in the geant output file. We draw the plot of (π+K) of StMcTrack invariance mass. The red curve requires 1)K and π come from same
position; 2)dR(primary vertex)>10^-10.
3.1 The Geant Hits Simulation
The simulation of Geant Hits is not incorrect now. We can see the single track can have a lot of hits. And most of them are at wrong position.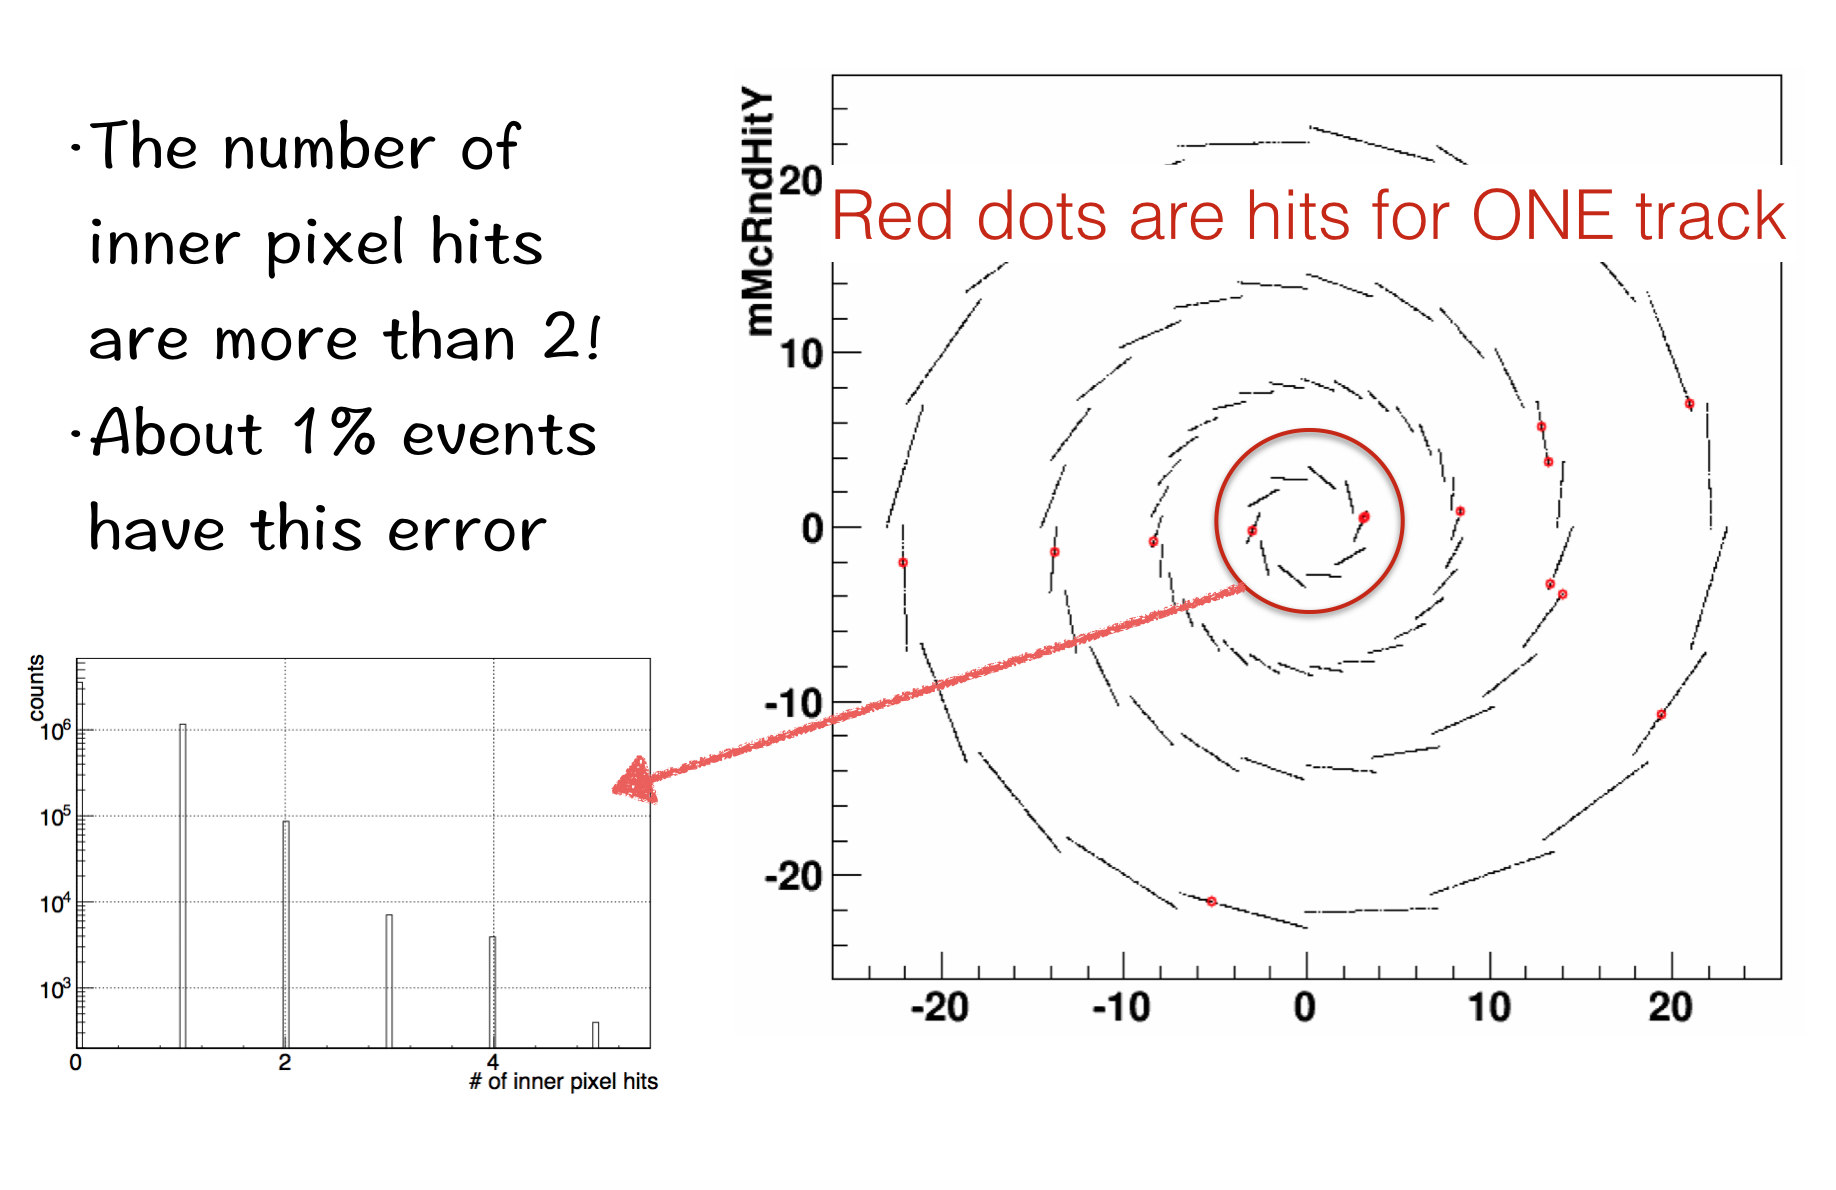
4.Analysis
Code example: /star/u/amcw7777/pwg/hft/pp_bc/StRoot/StAnaSimMaker
Script to run it: /star/u/amcw7777/pwg/hft/pp_bc/StRoot/StAnaSimMaker/runSim.C
The input files are .geant.root and .event.root which are generated by Geant. We are using StMcTrack class to analysis. We use StAssociationMaker to match the event level and reconstruction level.
        mAssocMaker = (StAssociationMaker*) GetMaker("StAssociationMaker");

        if (mAssocMaker) {

                mRcTrackMap = mAssocMaker->rcTrackMap();

                mMcTrackMap = mAssocMaker->mcTrackMap();

        }
In this way we can associate the simulation information with MC simulation. And we can also use MC cut to substract pure signal.
In this plot, the red curve is with Associated cut as mentioned before AND InvM(K+π)>1.8GeV.
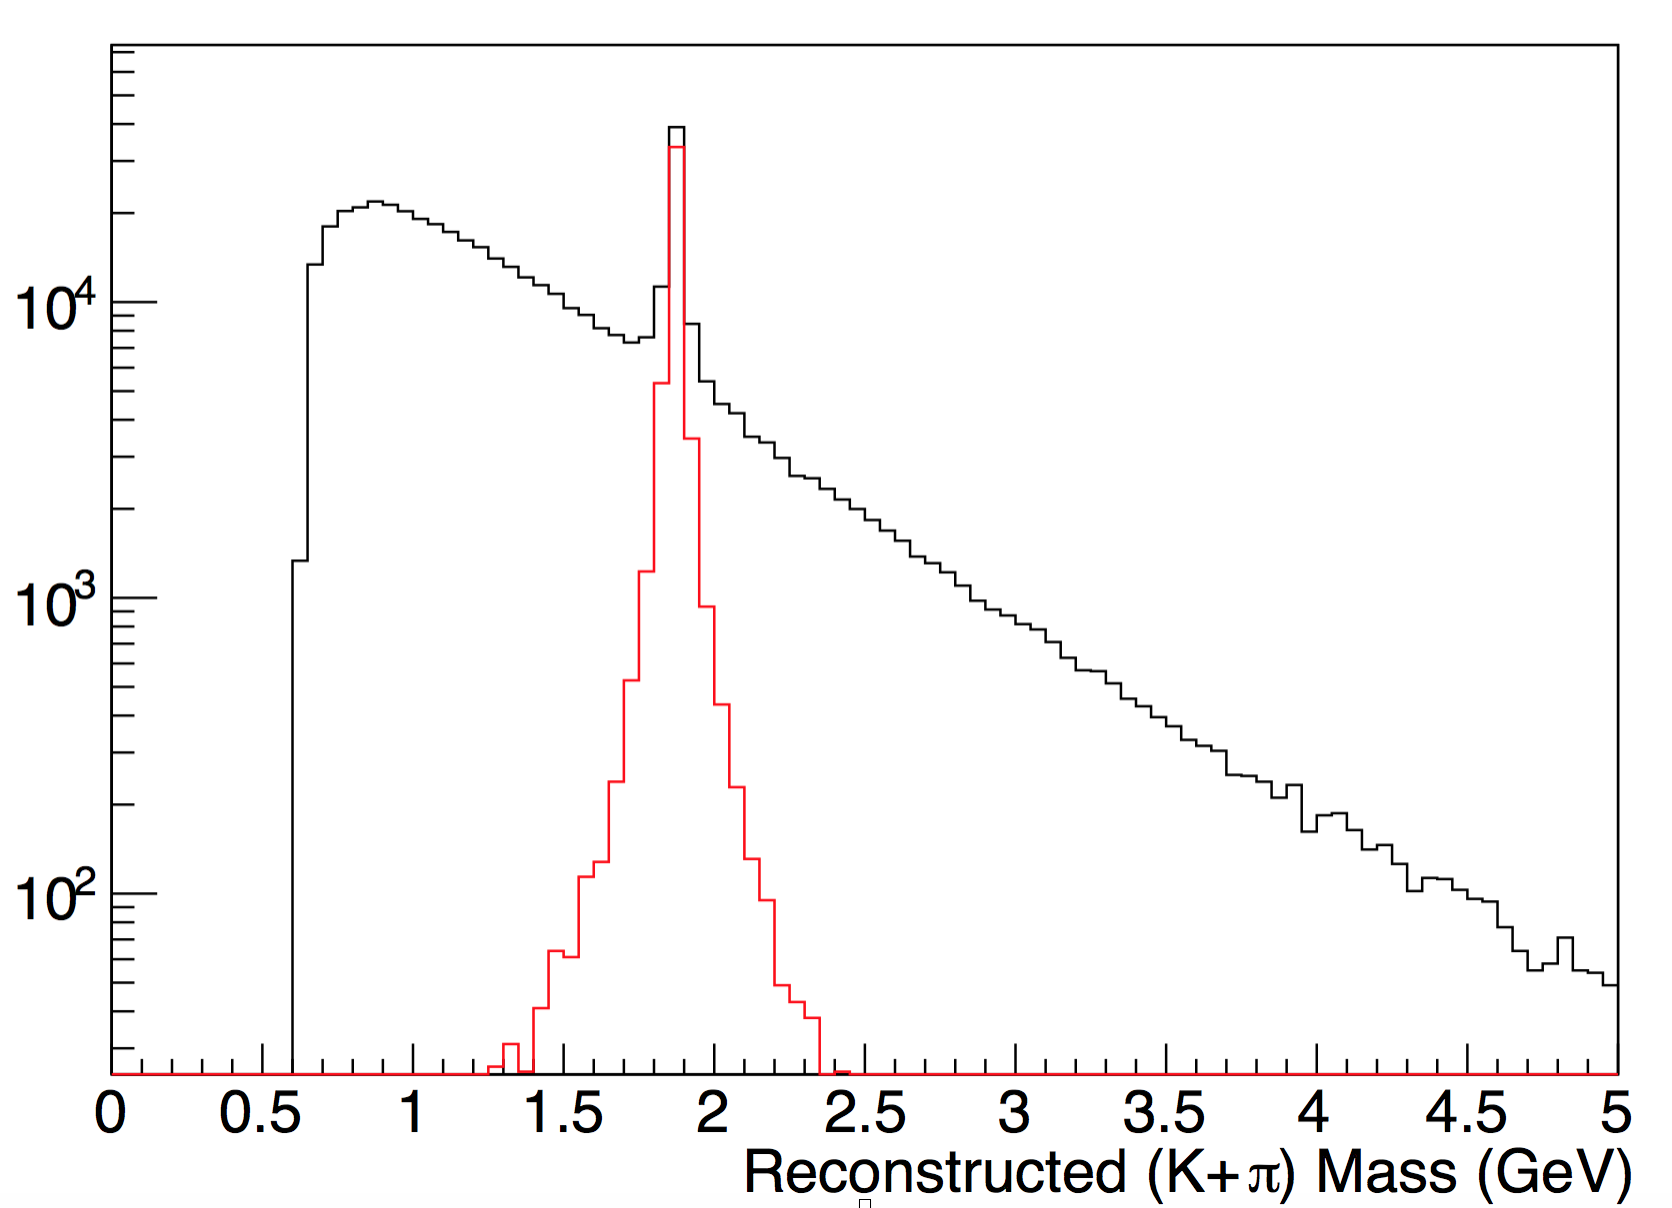
In this plot, the red curve is with Associated cut as mentioned before AND InvM(K+π)>1.8GeV.
4.1 The vertex finder
The vertex in reconstruction, has problem. We assume that it's due to the vertex find mistakes D0 as primary vertex.The following plot shows that:
The first one shows the ∆R of D0 and primary vertex. The left one is minBias sample and right one is D0 sample.
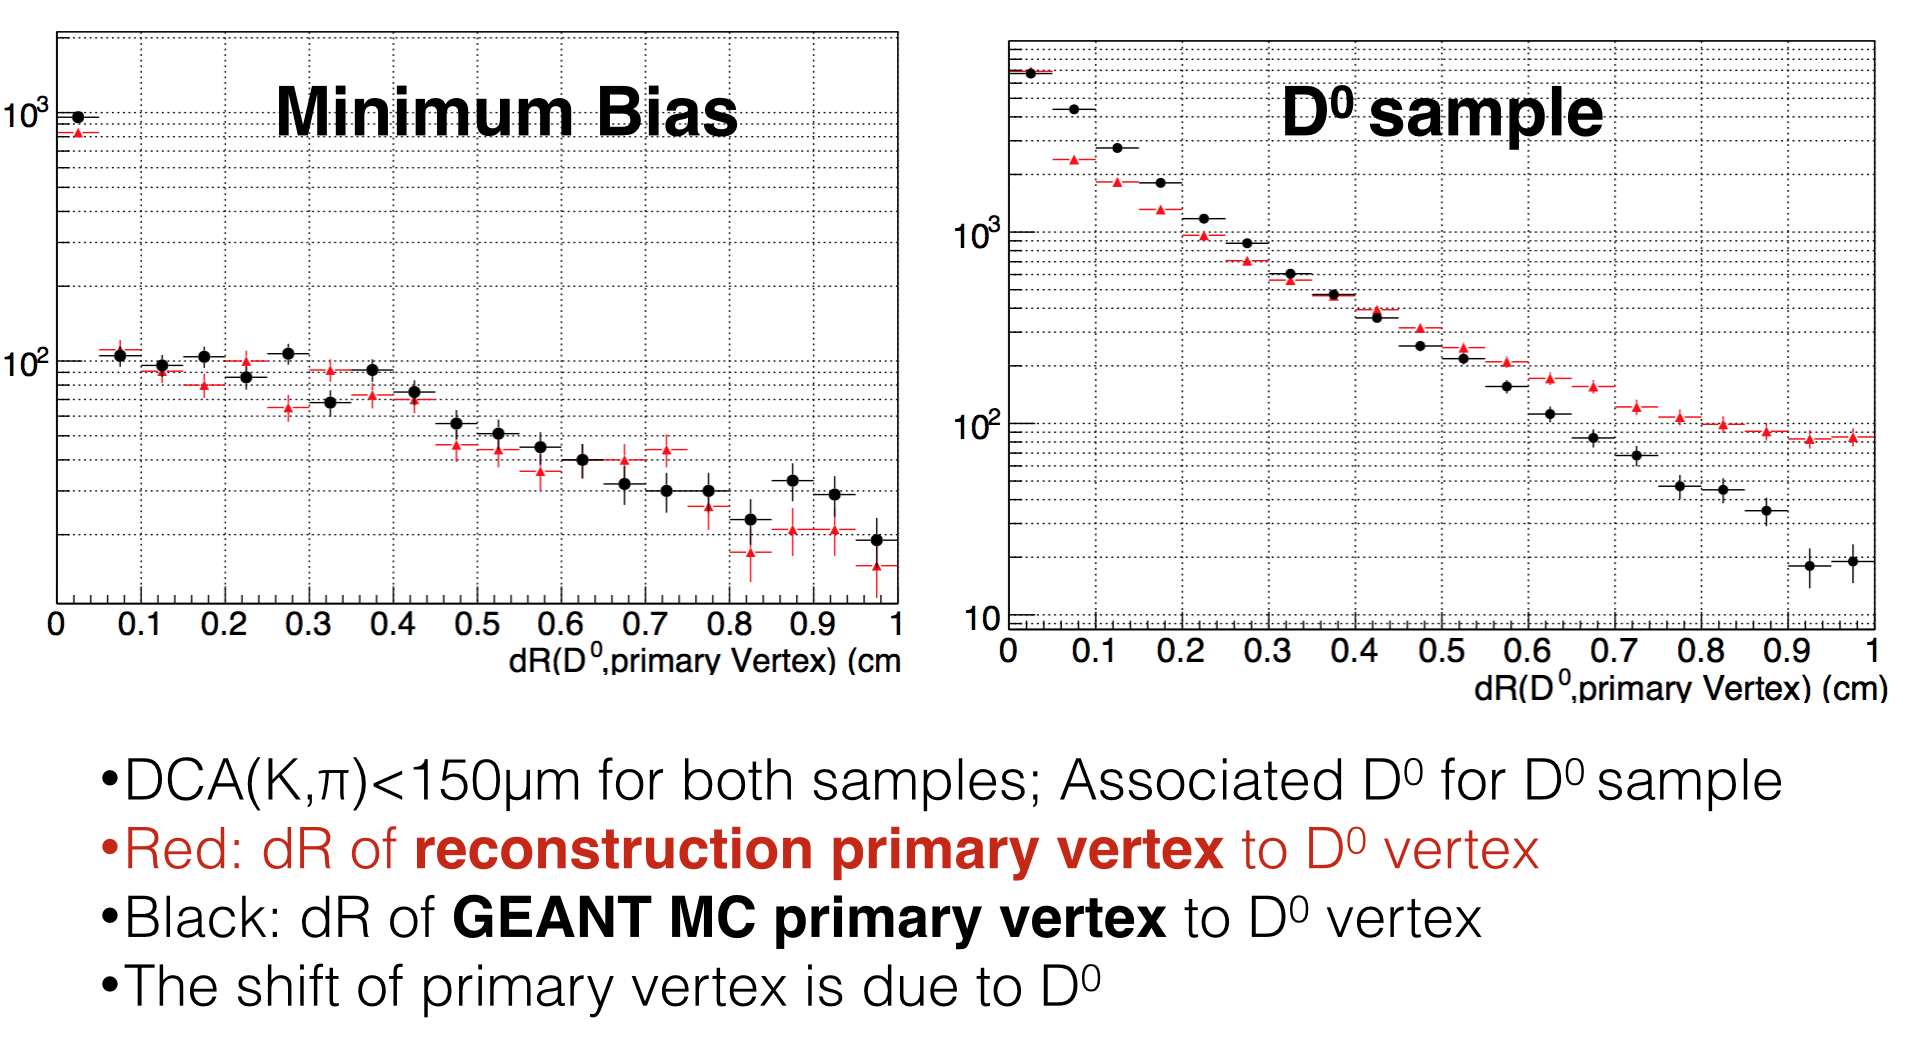
And we can enlarge the scale to 0.1 cm.
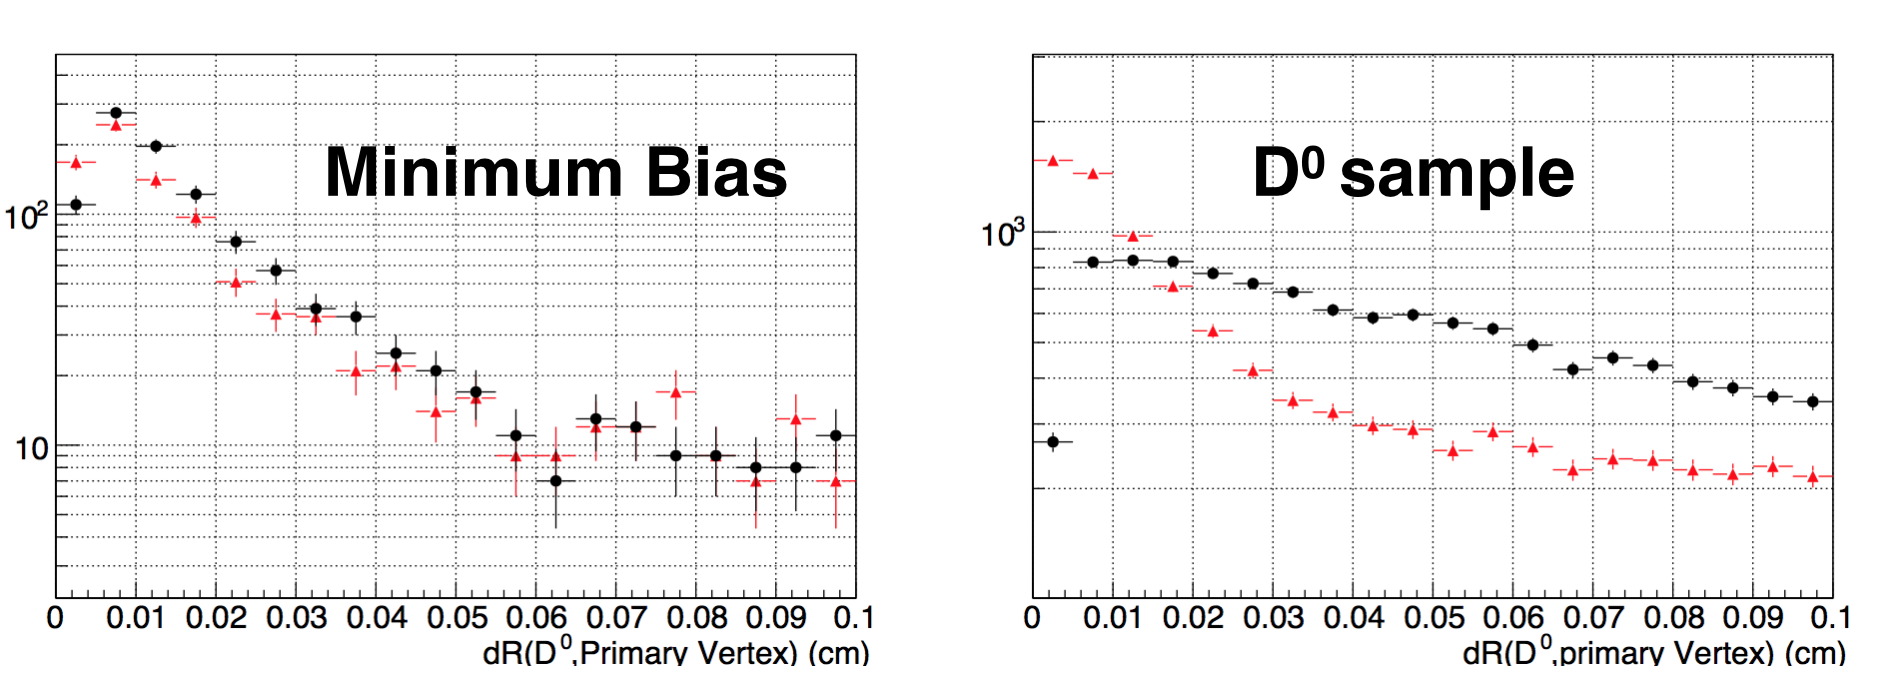
The conclustion is, the ∆R of Geant MC and simulation are much different. We suppose in some cases, the D0 is reconstructed
as primary vertex.
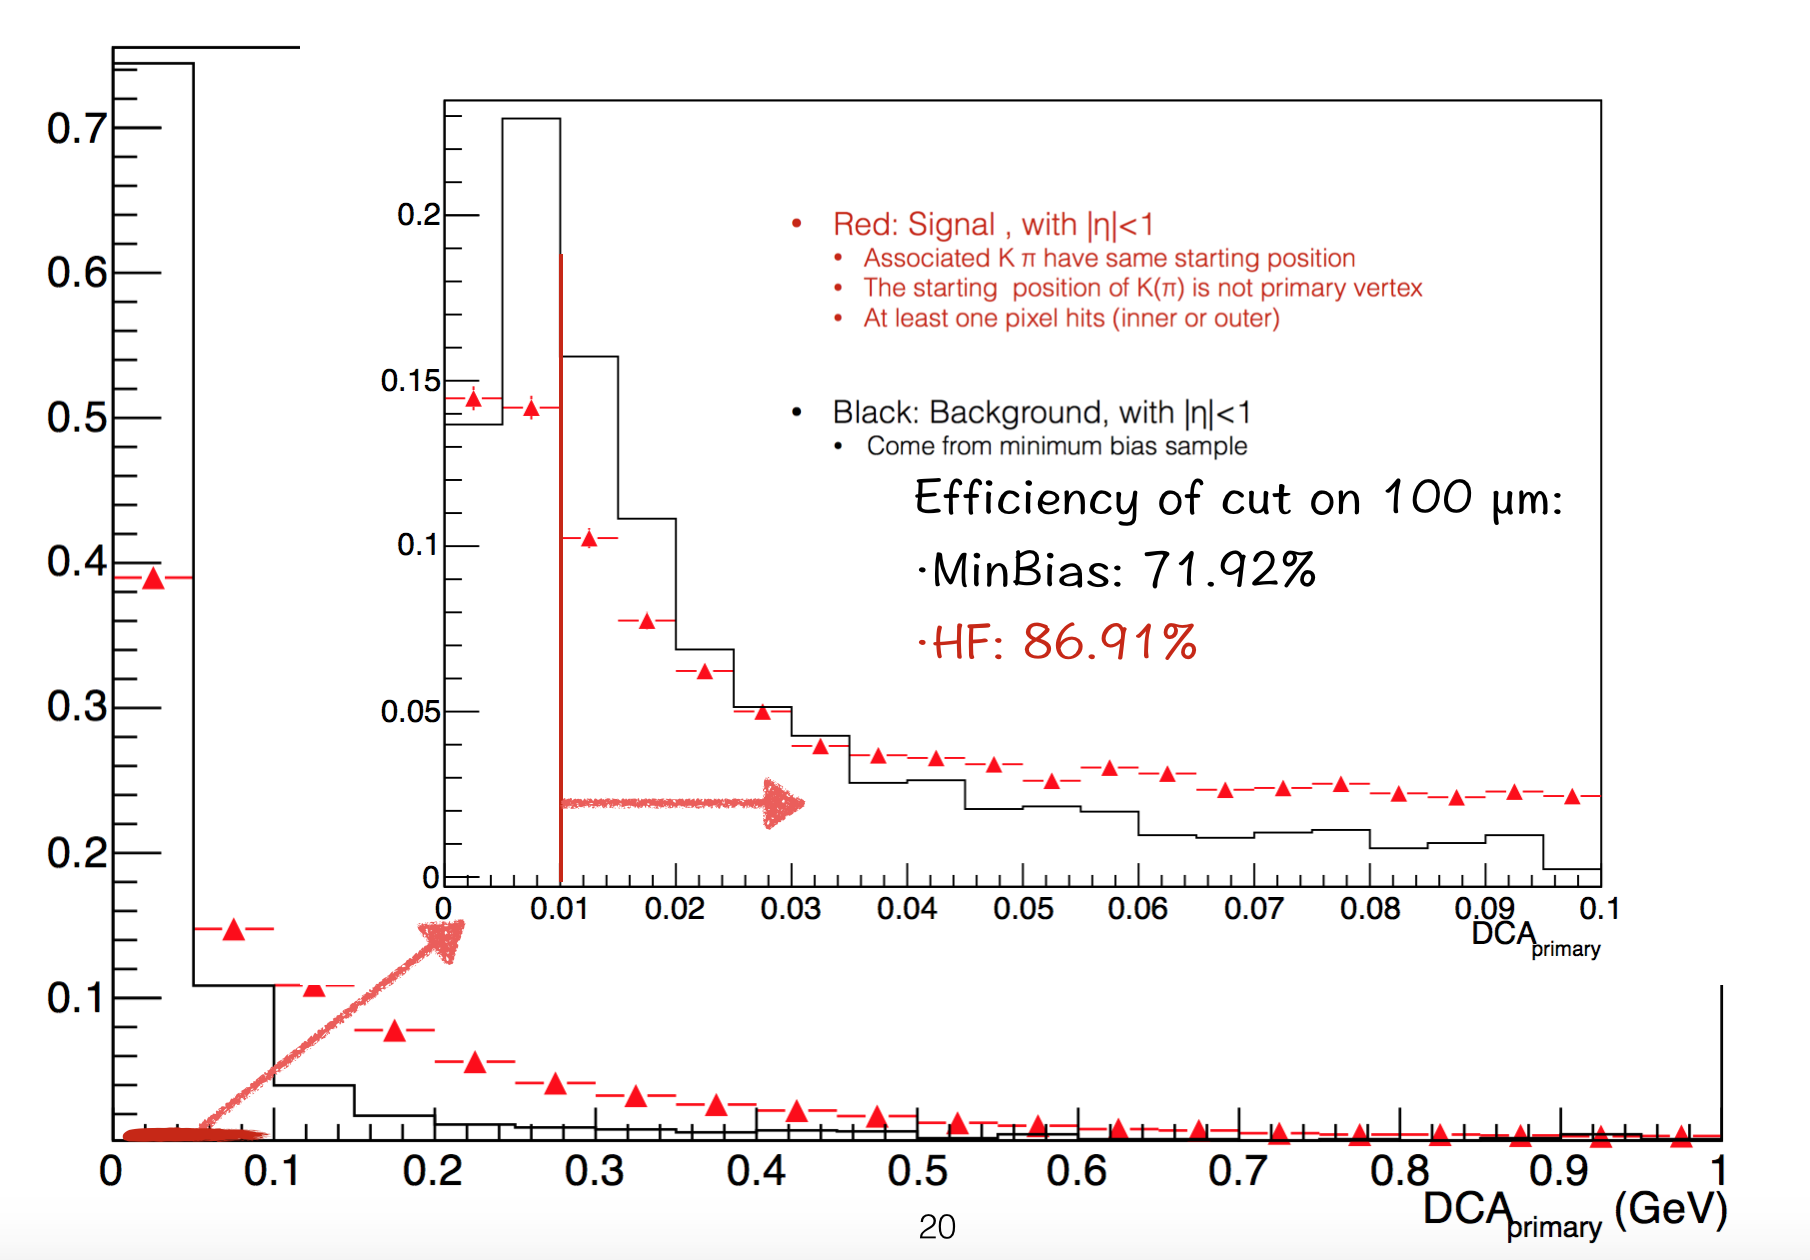
4.2 Topological cuts
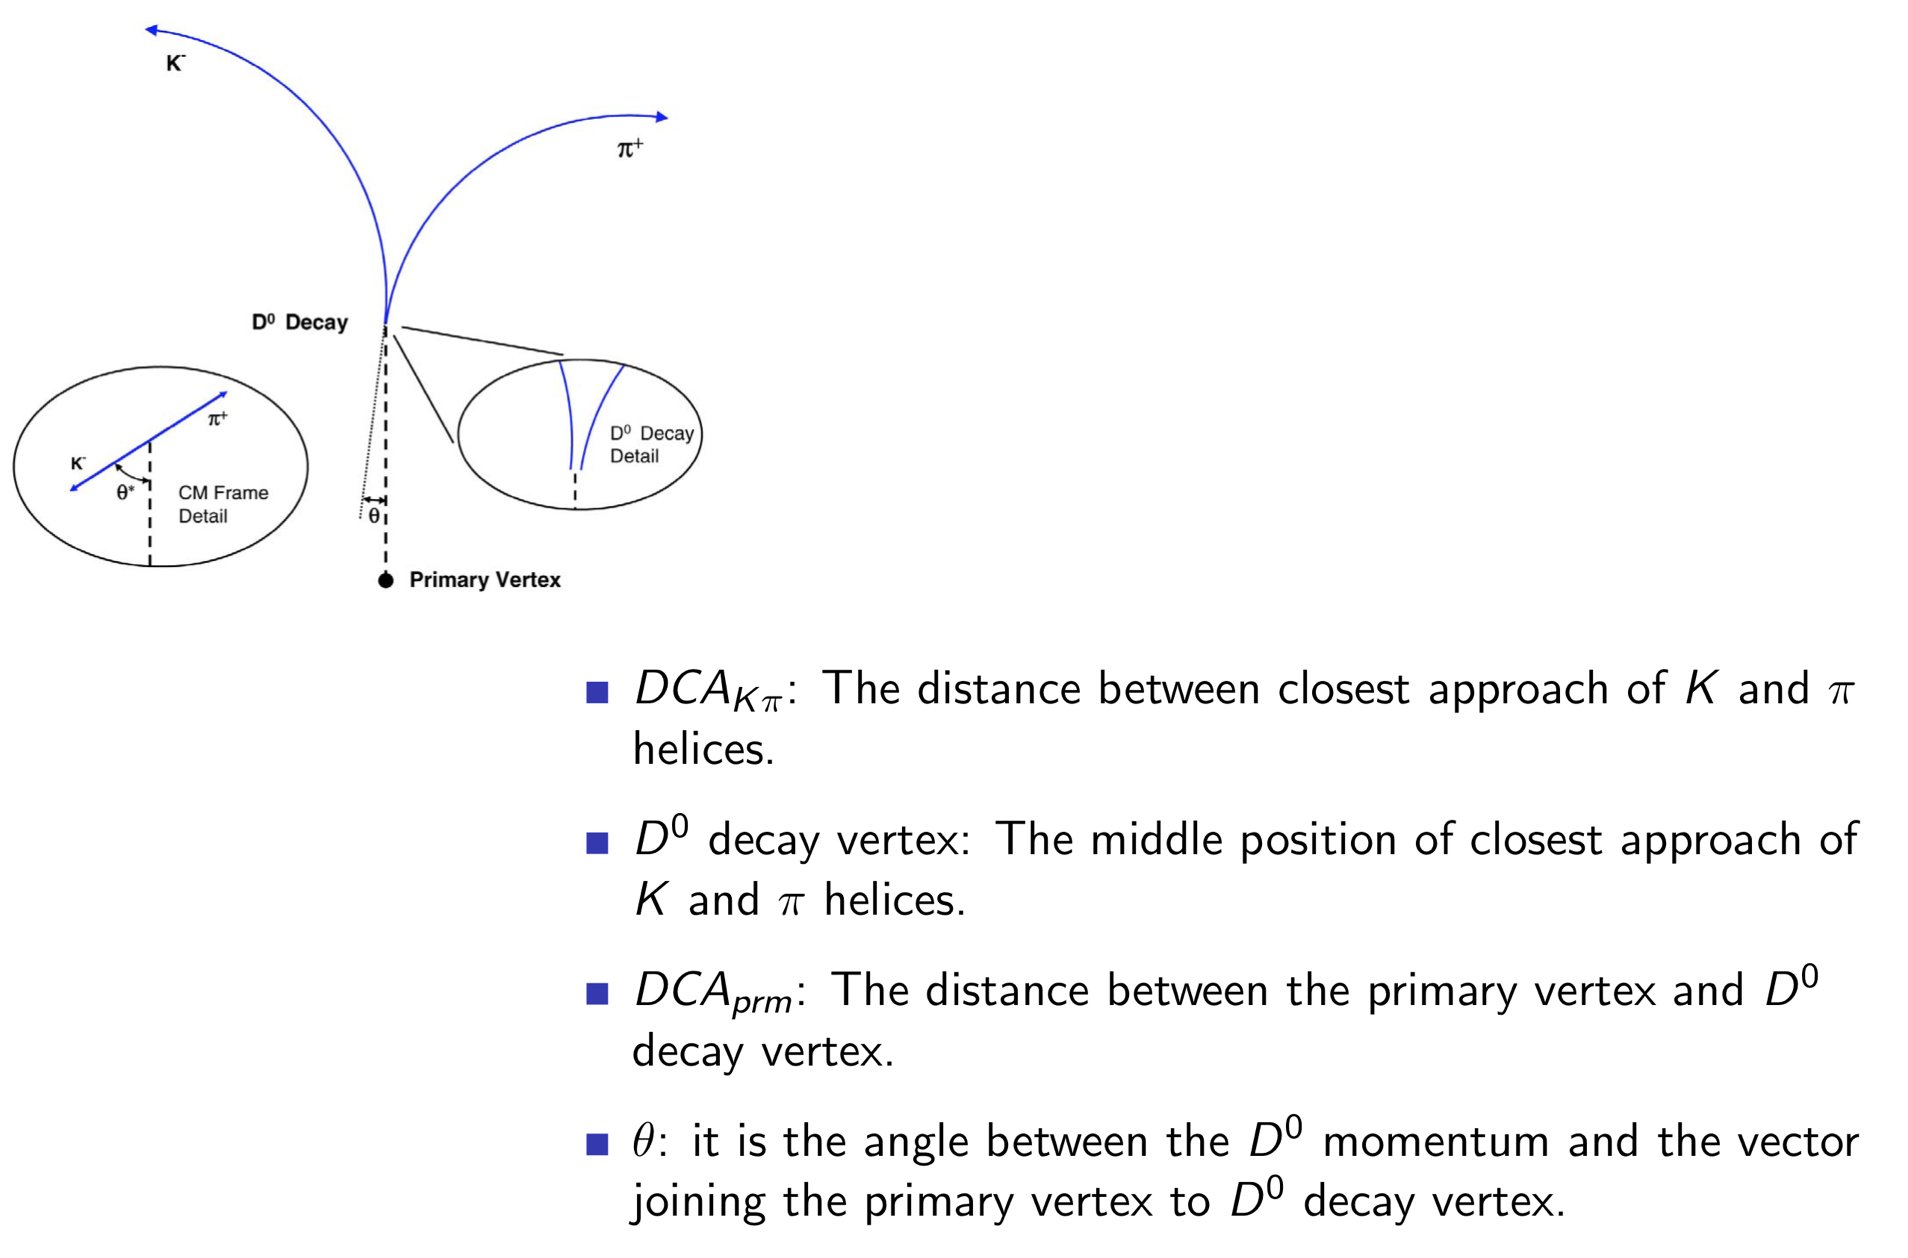
We have seen DCA_{prm}, but it may not be correct. Our expectation is that DCA is large with D0 sample than minBias sample.
So we cut on 100µm for it.
The next one is ∆R of K and π. Ideally it should be 0 for D0 decay, but we applied DCA_{Kπ}<150µm.

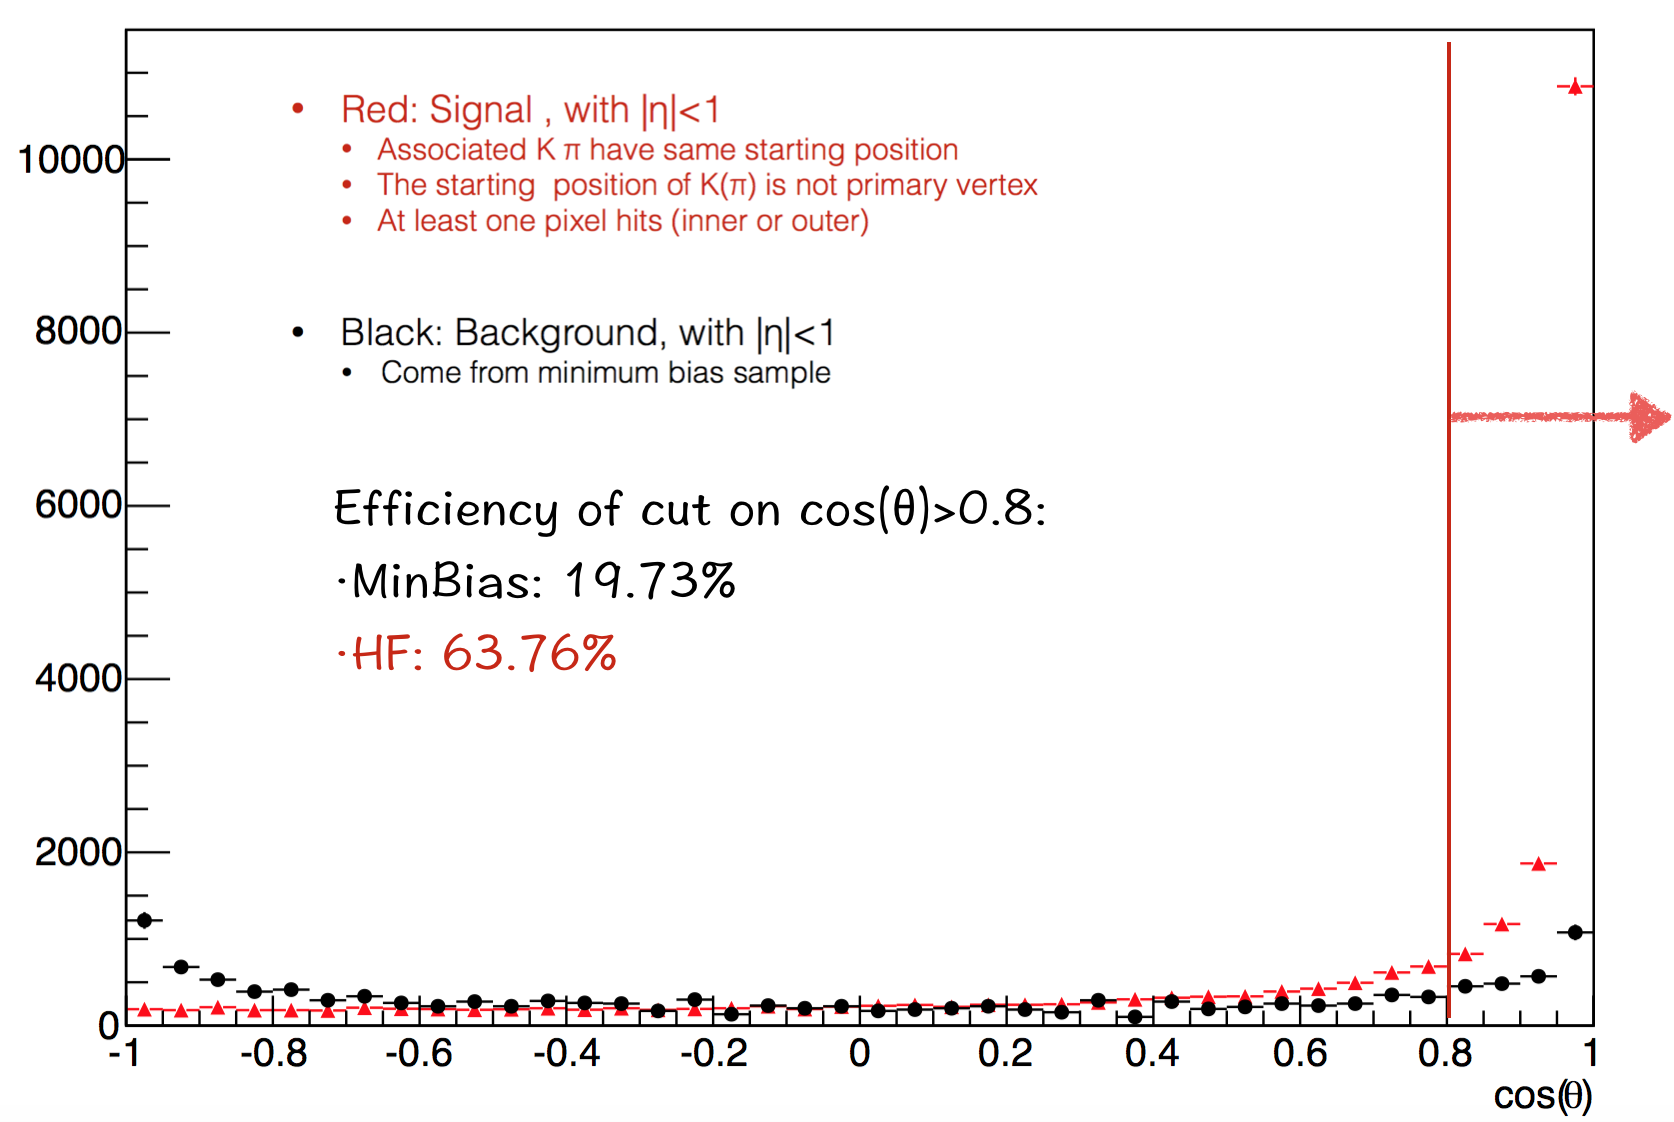
The last one is theta. It should be a very powerful cut. But it's not that good cause the vertex reconstruction.
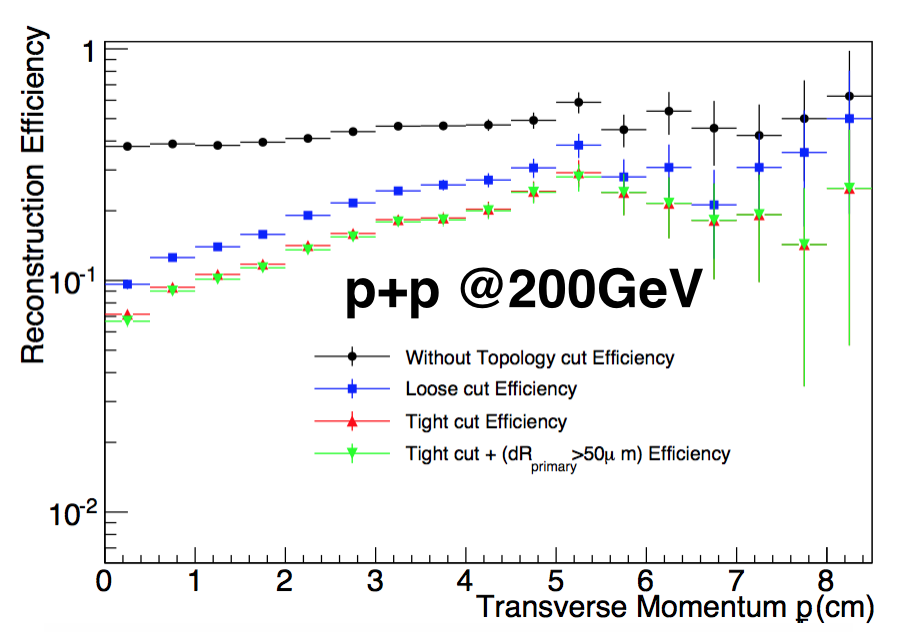
4.3 Efficiency after topological cut
Compared with Au-Au, the final topological cut is a little different.|
|
p+p
|
Au+Au
|
|
DCAKπ |
<150µm
|
<50µm
|
|
DCAprimary |
(>50µm)?
|
>50µm
|
|
|η|
|
<1.0
|
<1.0
|
|
#pixel
|
2 sets
|
2
|
|
#TPC
|
>20
|
>15
|
|
#TPC/poss
|
>0.52
|
None
|
|
cos(θ)
|
>0.8
|
>0.98
|
|
Δm
|
None
|
<35MeV
|
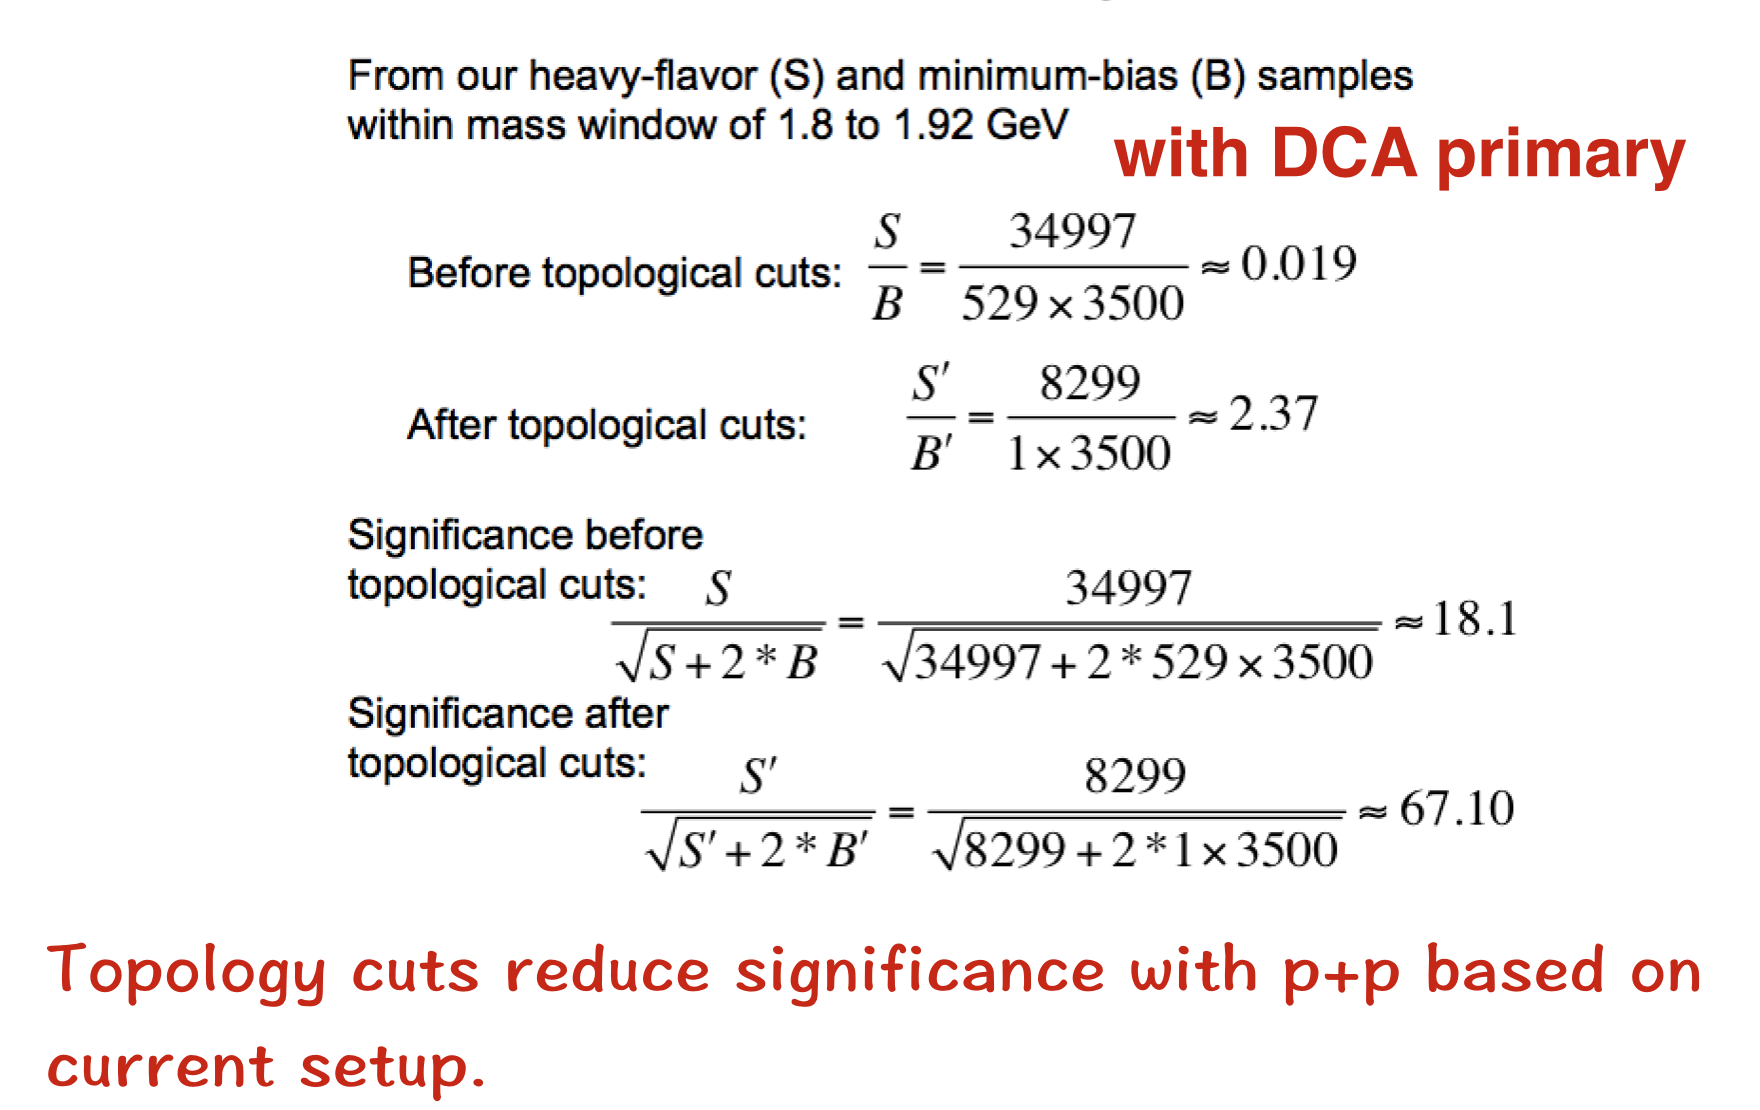
4.4 S/B ratio
5.Submit JOB to Condor
The script to submit jobs is: /star/u/amcw7777/pwg/MCProduction/submit/submit.sh
We can change the Njobs to control the number of jobs (parameter step is useless by now). I find that when I want to copy folders to condor, I have to zip them before upload using sandbox. Or I can only copy the files in that folder.
<SandBox installer="ZIP">

             <Package name="mydemox">

                <File>file:/star/u/amcw7777/pwg/MCProduction/Produce/starsim.C</File>

                <File>file:/star/u/amcw7777/pwg/MCProduction/Produce/.sl64_gcc447/</File>

                <File>file:/star/u/amcw7777/pwg/MCProduction/Reconstruction/runReco.csh</File>

             </Package>

 </SandBox>
Groups:
- amcw7777's blog
- Login or register to post comments